Wow, we are so excited to have our first workamping gig lined up! We have accepted positions at Welaka Lodge & Resort in Welaka, Florida. This looks like a beautiful, quiet riverfront campground. It is located in northern Florida, right on the St. Johns River, across from the Ocala National Forest.
We’ve always hoped to find a place a bit ‘off the beaten
path’ with a real sense of community. Candi interviewed with Becky, their
Manager, and this sounds ideal! Everything we hoped for! They’re in a small
town where you can bike down the road into town and folks will wave to you. A
small community, yet ‘big city’ is not so far away as to be unreachable.
So here it is, now it’s real. We have a deadline and goal. No more gray areas for us! Full Time RV living here we come!
From their website:
If I could have, to hold forever, one brief place and time of beauty, I think I might choose the night on that high lonely bank above the St. Johns River. –
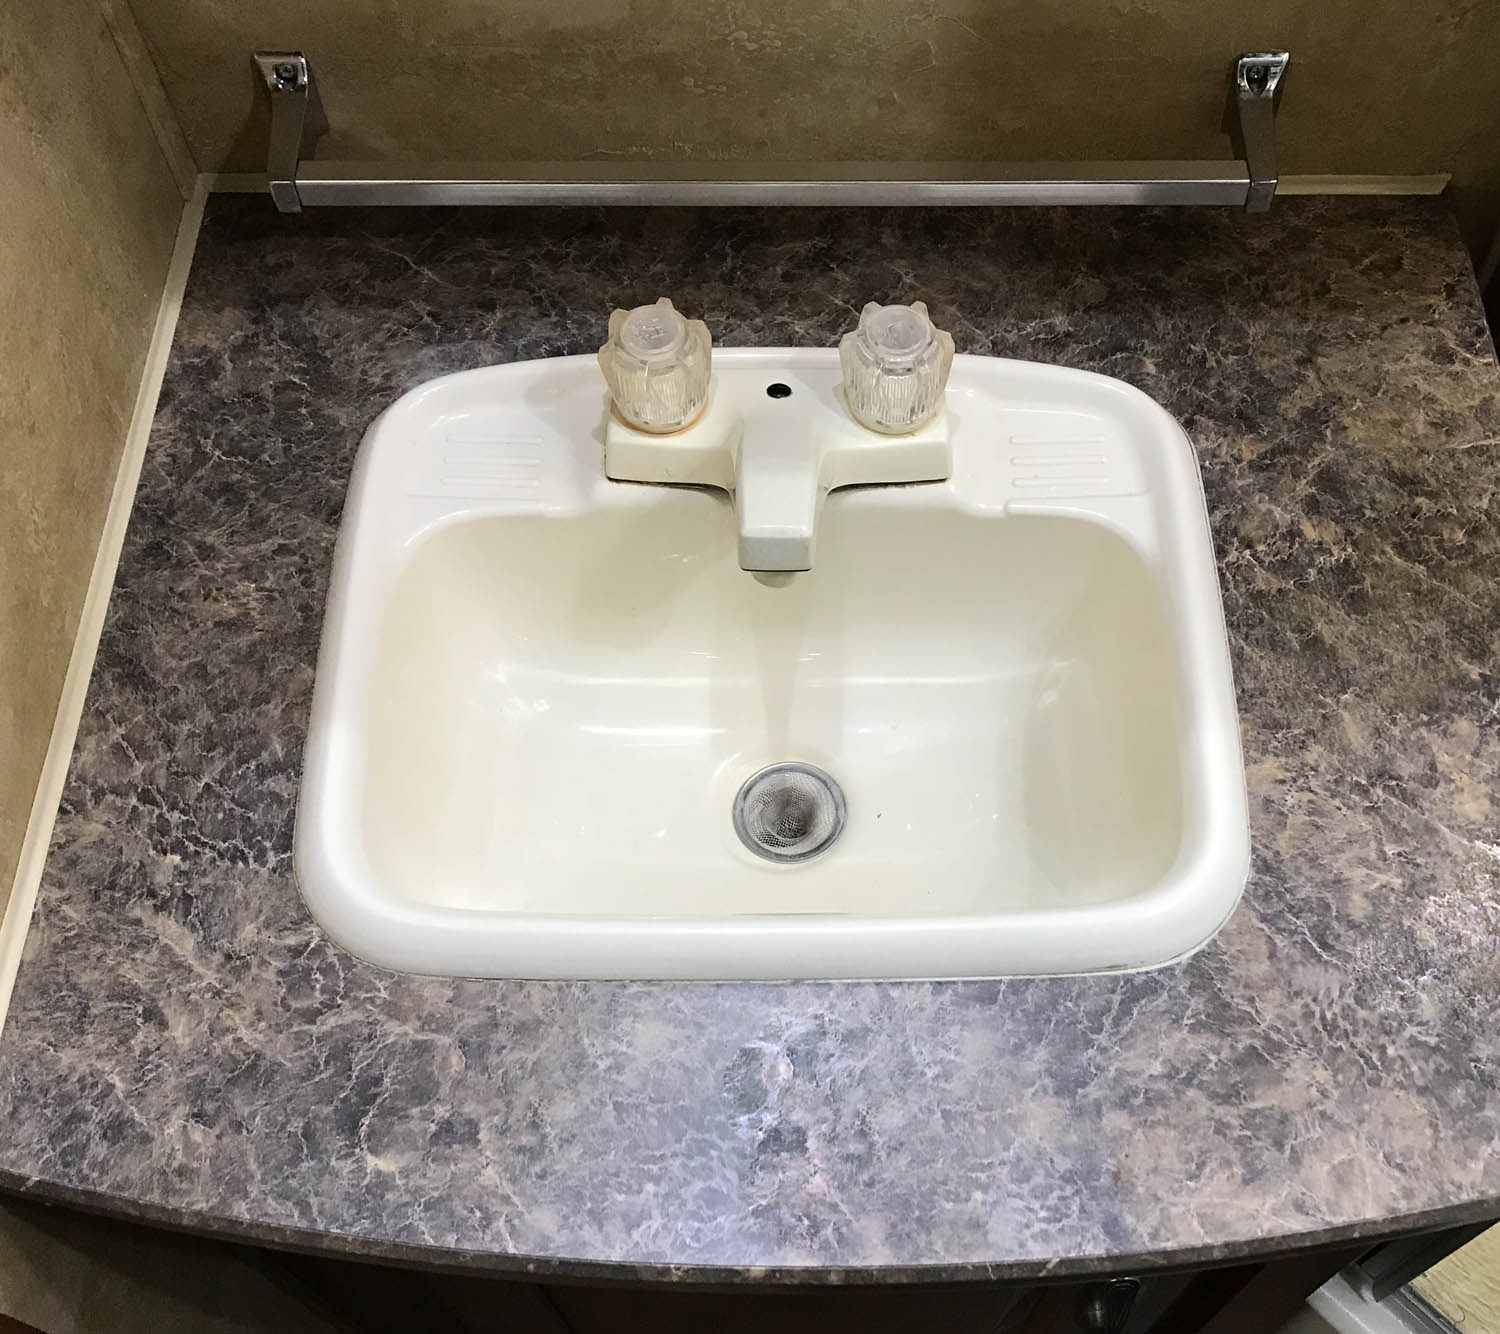
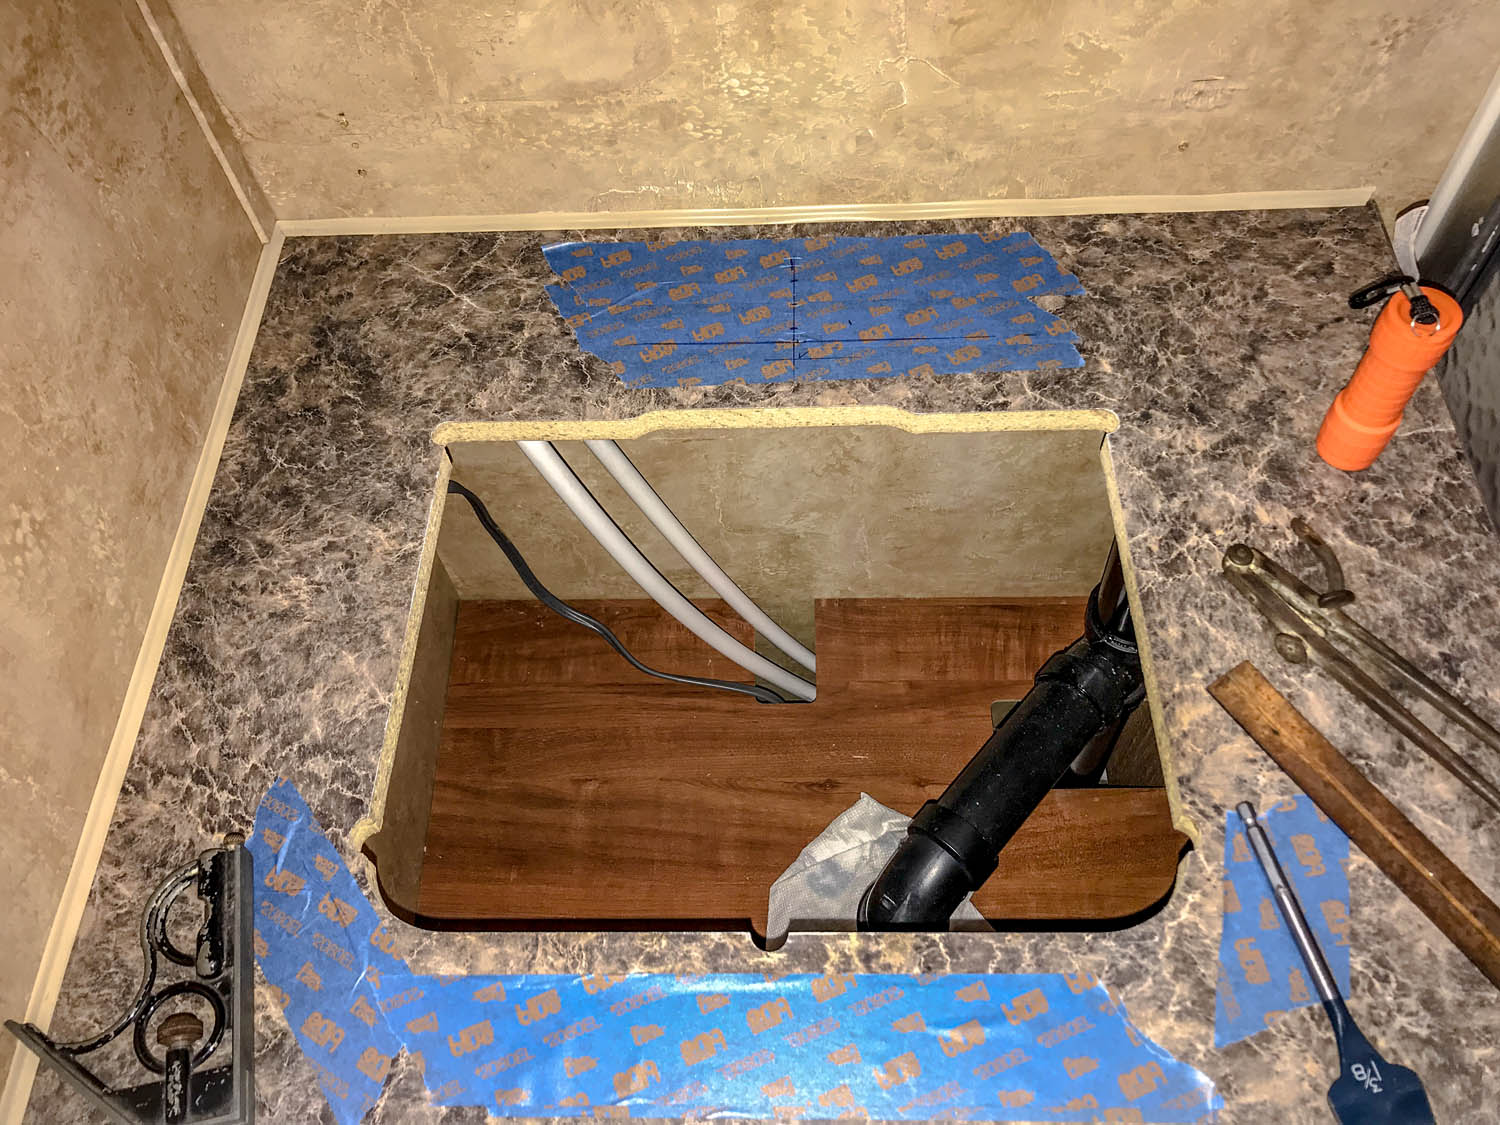
Ok, anyone who was born and raised in Bawlamer (that’s Baltimore for those foreigners) knows that you pronounce ‘sink’ (as in the sinking ship) truly as “zink”, no … not the metal plate you put on your propeller shaft to keep it from rusting … c’mon hon, itza zink, yew know hon, where you’s warsh yer hands! Anyways, our bathroom zink, er .. sink, had this standard, awful, tiny plastic sink.
We hated it. So, what to do – we replace it. The problem was, the cabinet was so small it was impossible to find any kind of drop-in that would fit. Just wasn’t going to happen. So, we changed gears and found a relatively small vessel sink that would fit in to the same space. We decided on this from a company called Fresca https://www.build.com/fresca-fvs6119/s921517?uid=2309030
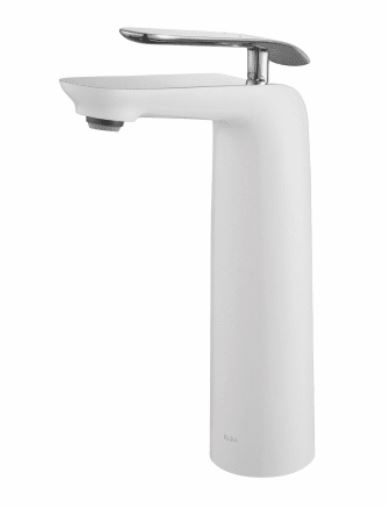
Then comes the issue of the faucet, the problem there being the limited height to deal with since we have a cabinet over top. It turns out that vessel faucets come basically in two styles, medium height, or tall, and not a lot in between. Thankfully, we did find one that wasn’t too tall. It would fit comfortably below the cabinet above the sink and it matched the white porcelain of the sink! We found this at Build.com. https://www.build.com/kraus-fvs-1820/s1135363?uid=2724681&null.
Now comes the fun part, making it all happen. Let me say this up front, I am not a plumber and I don’t play one on TV. But I have a little common sense (my wife would argue that) and I did manage to change my kitchen sink so … what the heck, here goes nothing.
Lesson 1, learned the hard way (in the kitchen). If you’re working in confined space on a cabinet – take the door off! That may seem like a duh moment but, I almost broke a kitchen cabinet door by NOT doing that first.
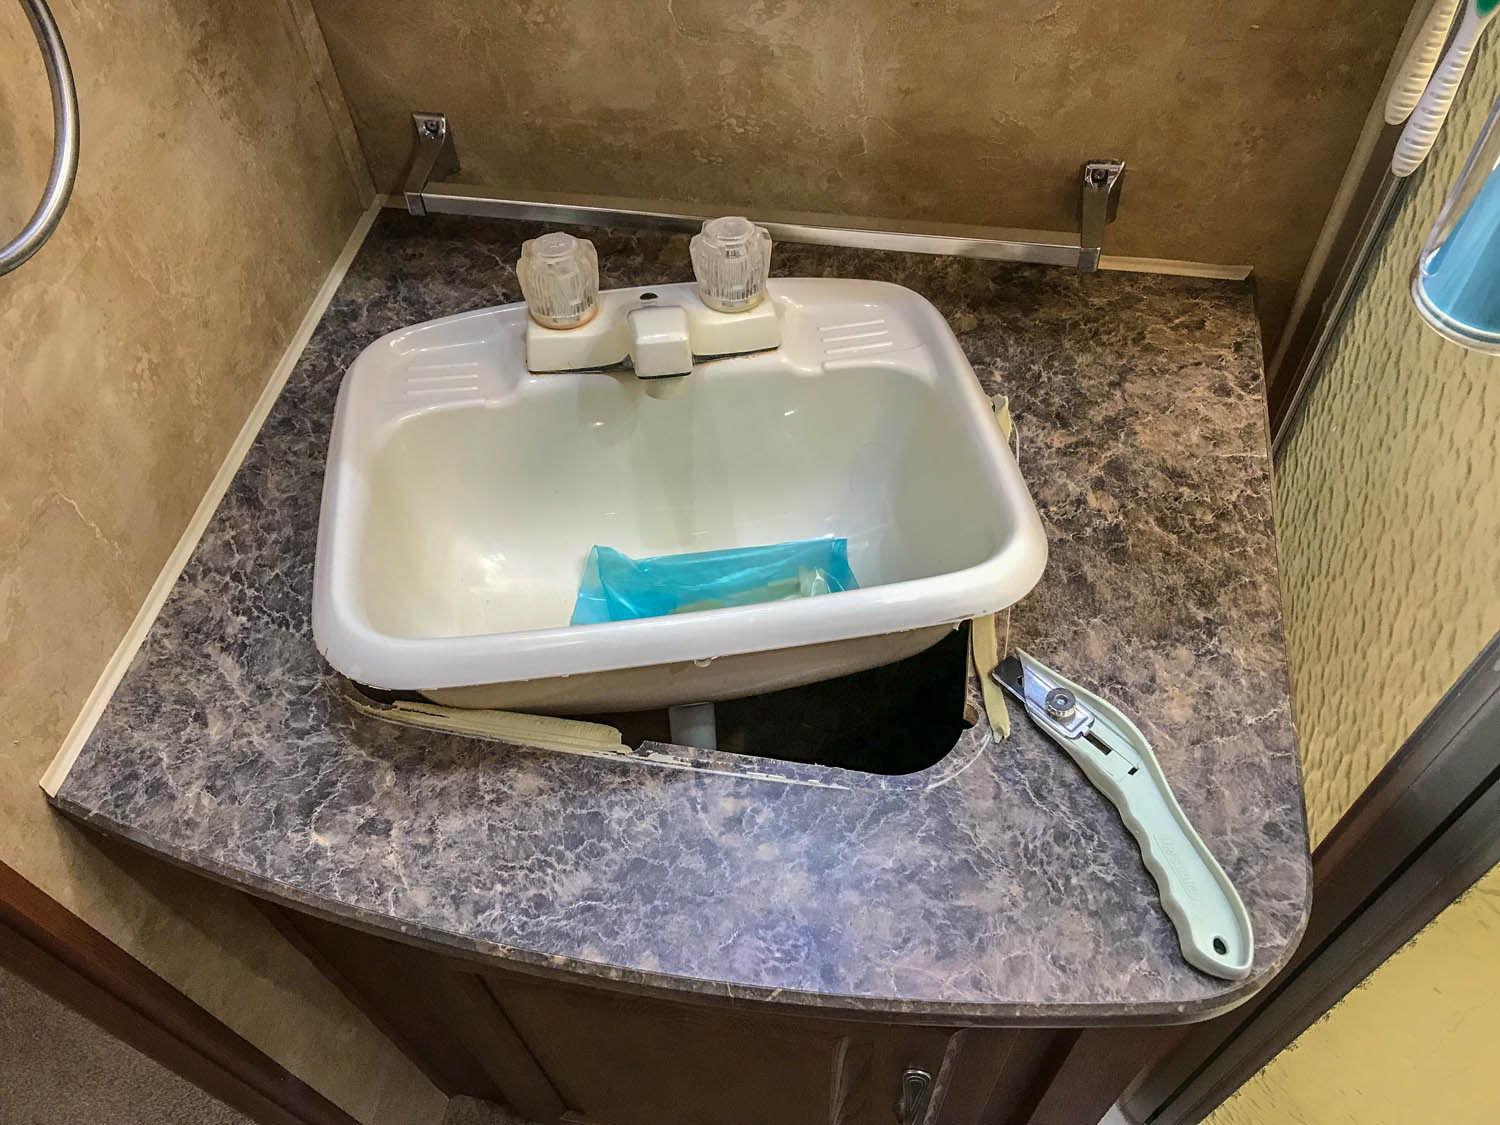
Next, remove the sink. Ha, you think this is easy?!?! What can it be, remove a couple of screws, lift it off, done! … Till you realize they must use some kind of earthquake proof super glue adhesive type plumber’s putty that absolutely, positively WILL prevent your 2 lb. plastic sink from ejecting out of the cabinet in the event you roll your rig over ONTO the TOP OF a SATURN 5 ROCKET, while it is exiting the stratosphere, on its way to Mars! Needless to say, a straight edge razor and some gentle prying is your friend.
My next step was to figure out where to put the faucet, and since this is a new add on and not part of the sink, I had to install this as if it was a new installation. So, the old adage measure twice, cut once … well… measure about 10 times, drill once … painters tape makes it easy to mark up …re-mark up … till you’re sure.
After the hole was drilled, the faucet was easy. Just drop it in, use the mounting flange that comes with it and tighten it up.
Next up, the water lines. We had the standard water lines, I wanted to add shut off valves. No worries, a quick trim of the PEX lines, add a valve, done. And to be totally truthful … I pretty much HAD to put shut off valves in because this idiot forgot to mark which line was hot or cold … so …this made it pretty much easy to fix if I get it wrong … hey, truth in journalism right?
Now it’s time to drop in the new sink – fortunately for us, this is a vessel sink that sits on top of the cabinet so as long as it covers the old hole, I don’t need to cut any more of the top out. Nor do I need to cover the hole with a filler top, it was large enough to cover. So with a little planning for position, on it goes and gets glued in place with an adhesive. In my case I chose Liquid Nails, or I could have used a good silicone adhesive. I had a tube of Liquid Nails – so that’s what I used.
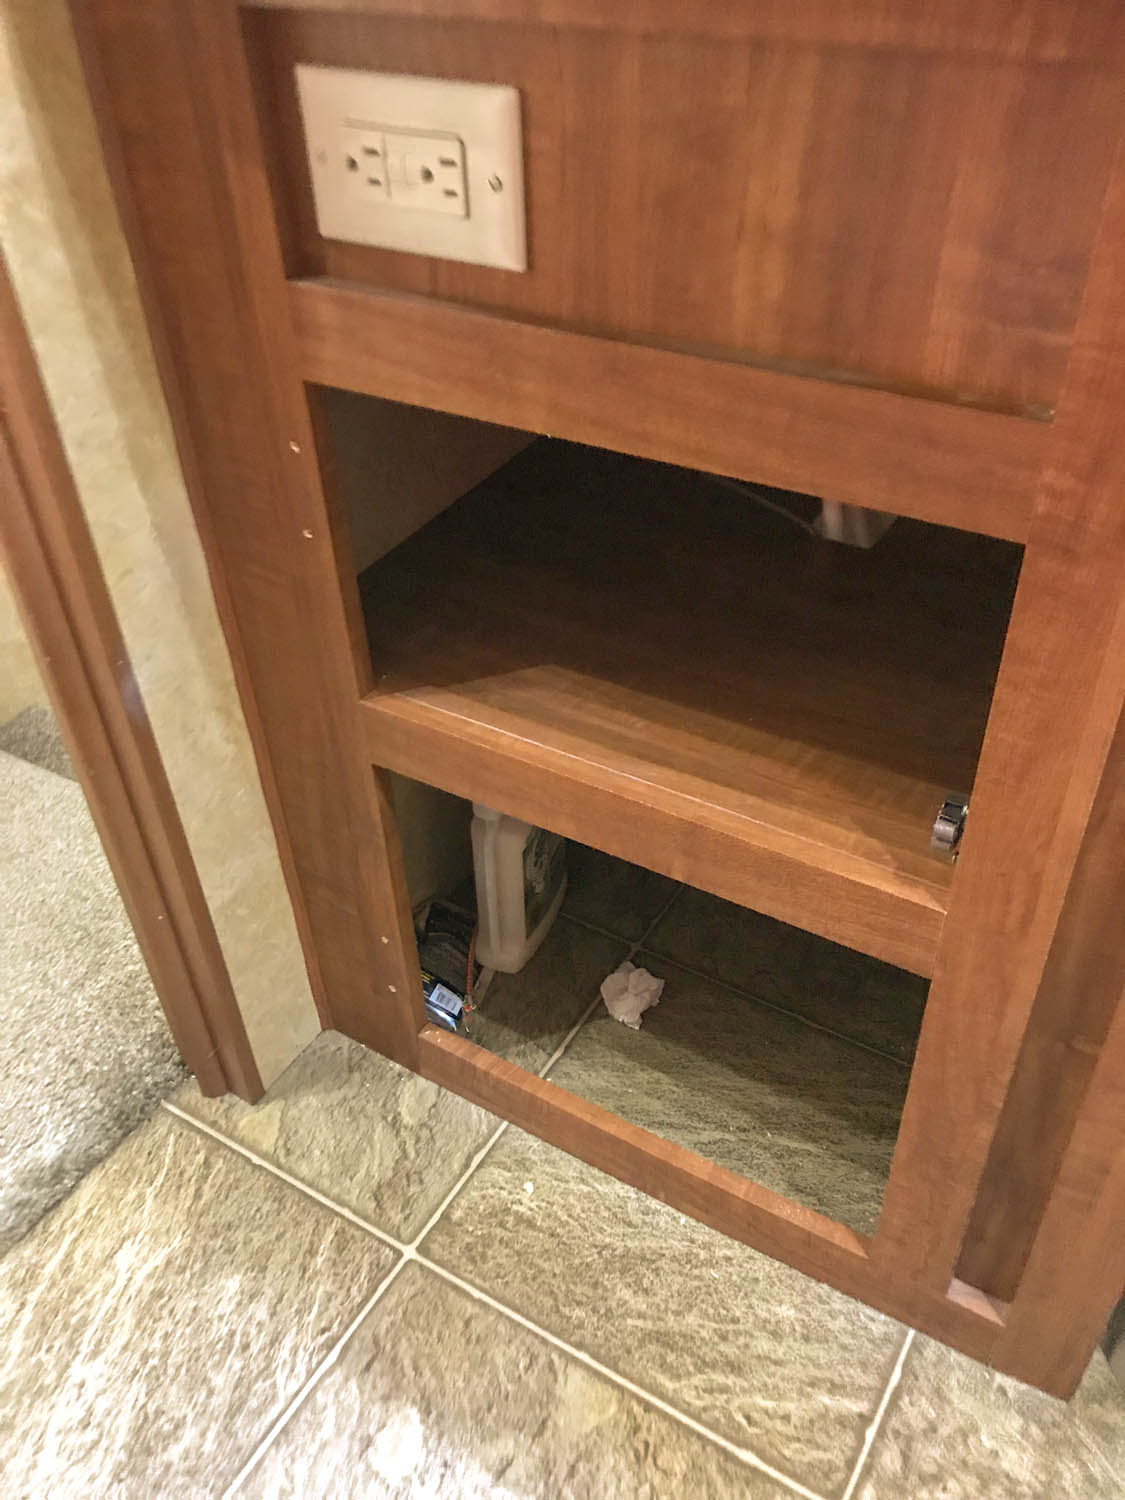
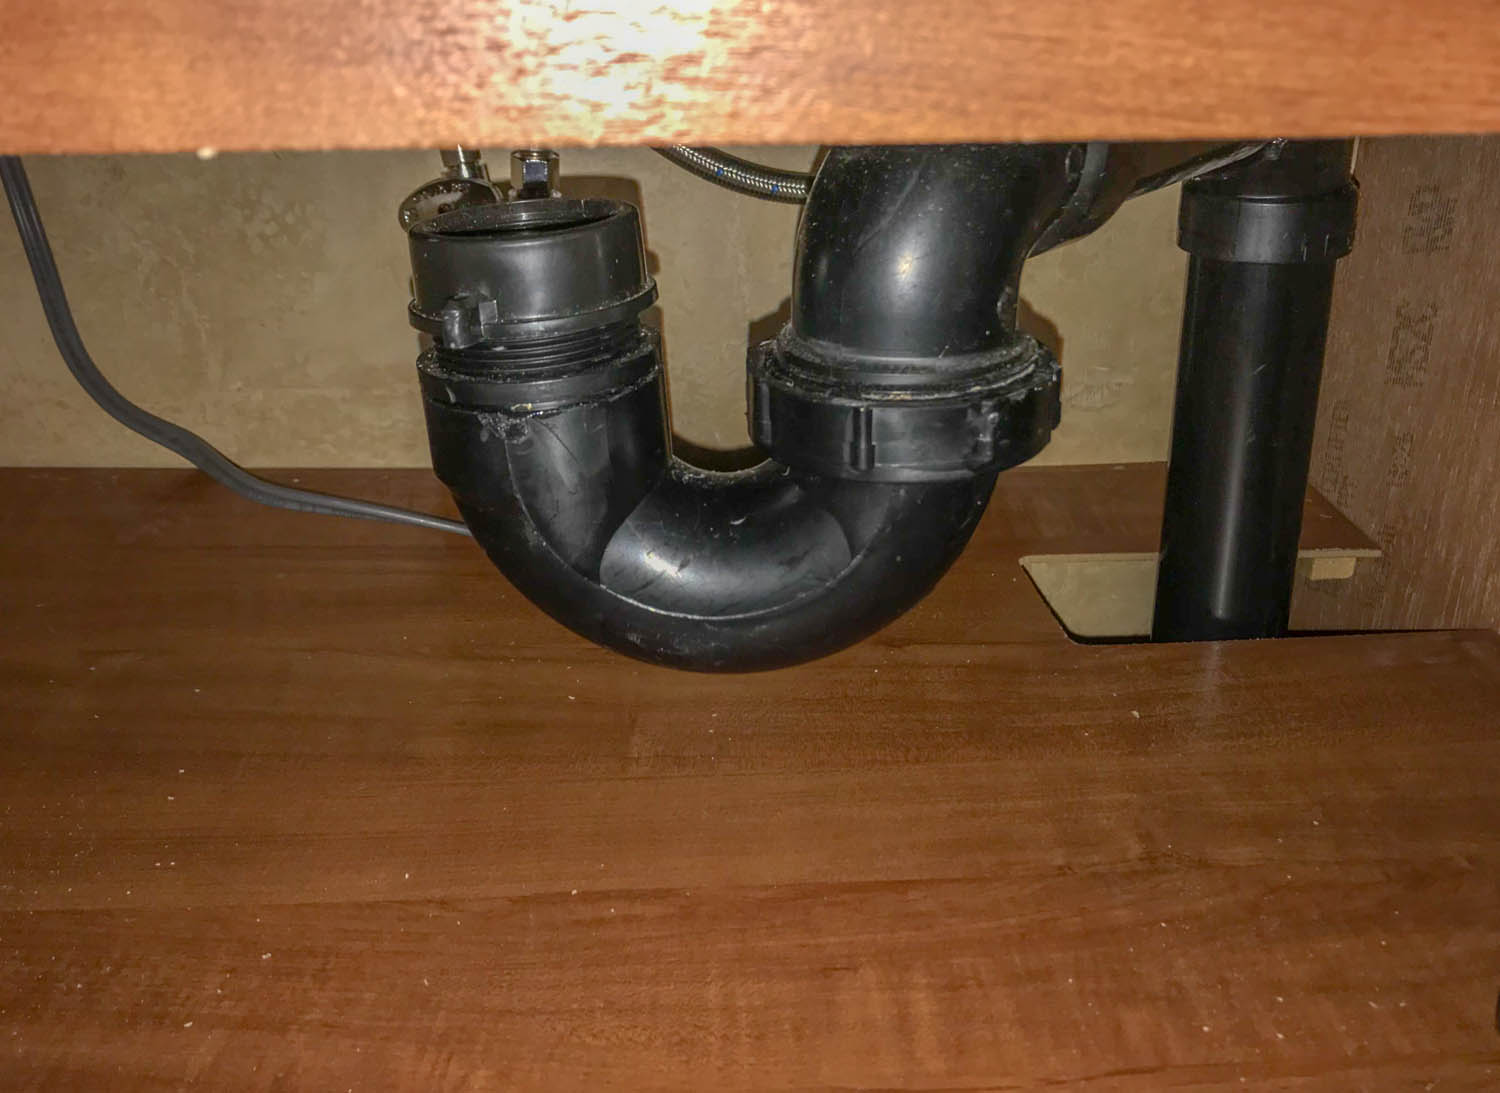
Lastly is the drain. This is a tiny cabinet underneath and I wanted to hold onto as much storage space as I could. The P-trap basically made most of the space under the sink pretty much useless.
Fortunately for us, we went to the Hershey RV show and there was a vendor there representing the HepvO Sanitary Waste Valve. It’s a pretty unique device, very simple in design, that totally eliminates the need for a P-trap. So that is what I installed to open up the space underneath the sink for more storage. (Which BTW, I also did to our kitchen sink opening up more usable storage in that cabinet also!)
So, voila! … done! Small, cheap, ugly bathroom sink gone – new, larger, more attractive bathroom sink added!
Every RV’r in the known universe has had the time when some @%$# idiot jack_ss in a tiny little Honda Civic decides they absolutely, positively, NEED to cross from the lane to your left, to the exit ramp a lane plus to your right. (And it’s usually got a rear spoiler wing on the back, and muffler that makes it sound like a weed eater – right?!?). Either that, or you finally made it to the bottom of that 4 mile 18% downhill grade, and you’re wondering if it’s actually possible to step on your brake pedal hard enough to actually touch the back of your engine – while the smoke clears from your front brake pads that just disintegrated?
FEAR NOT!
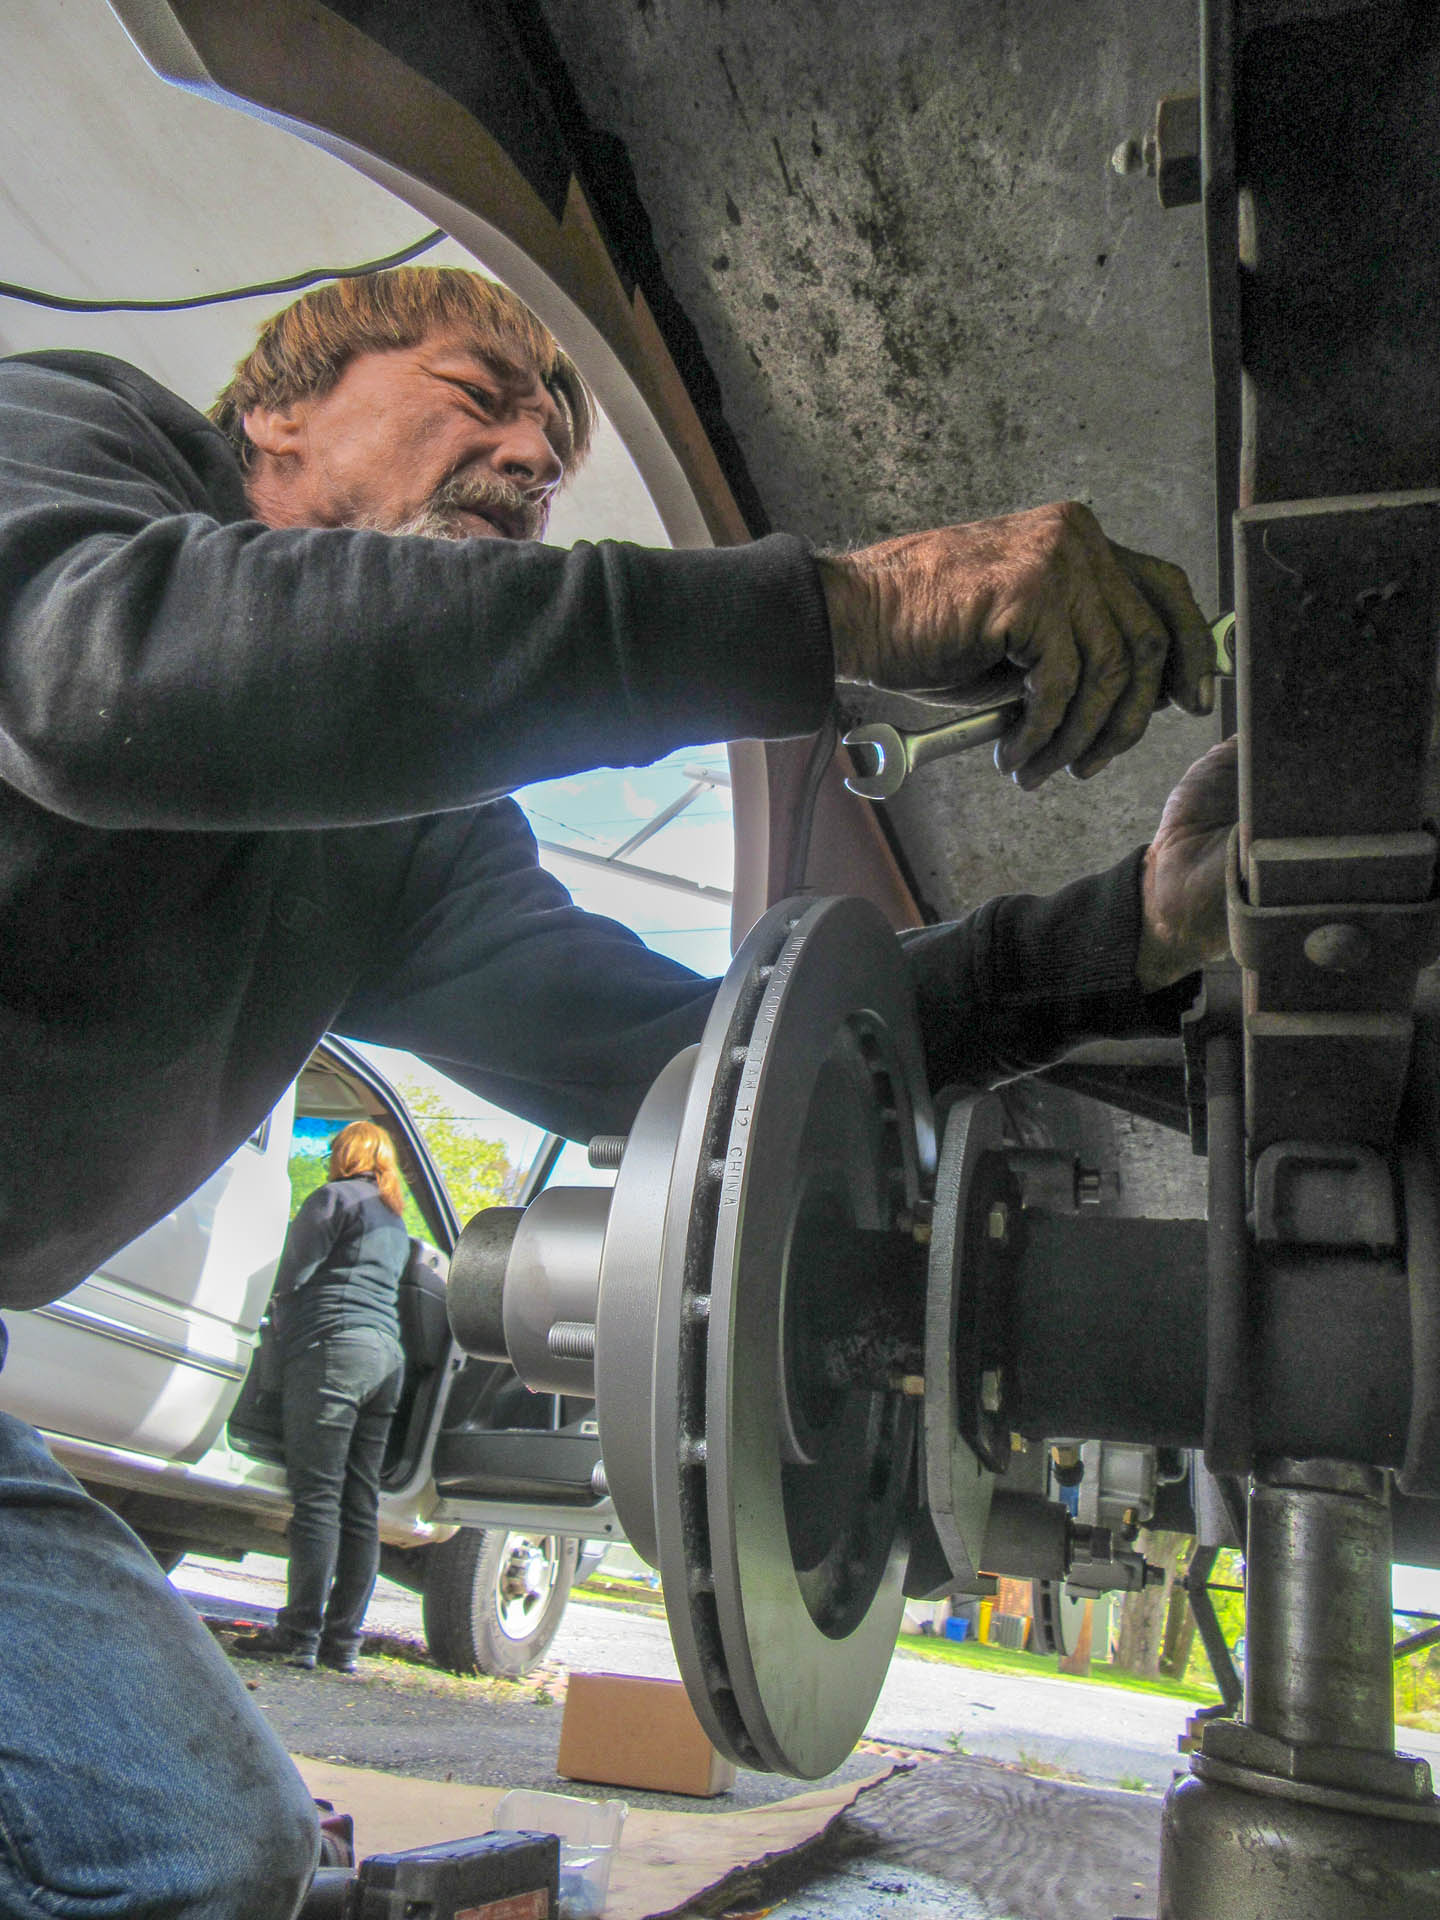
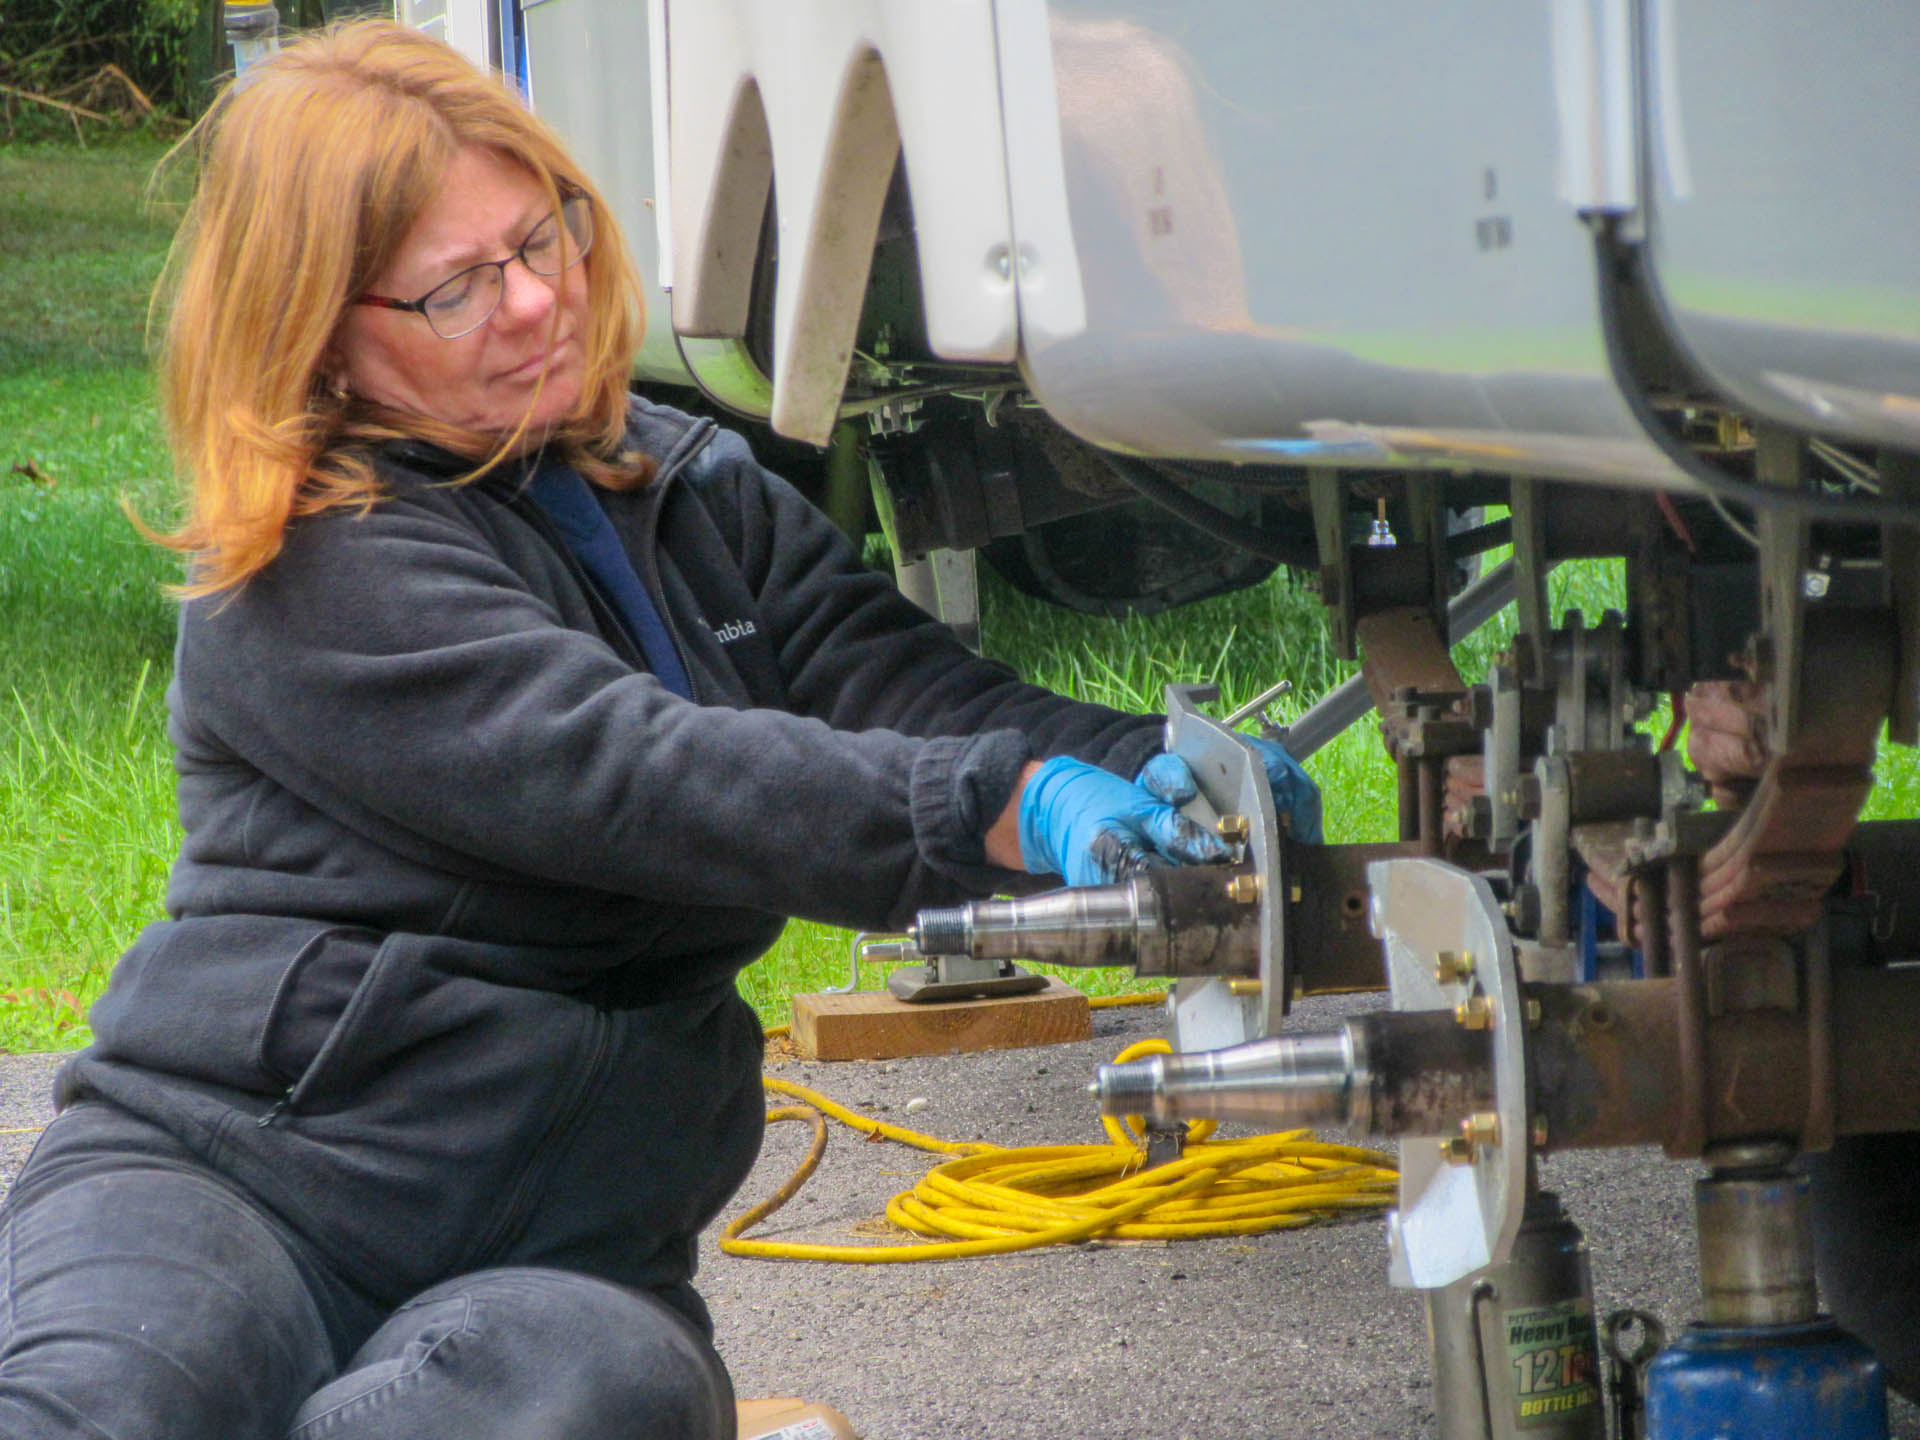
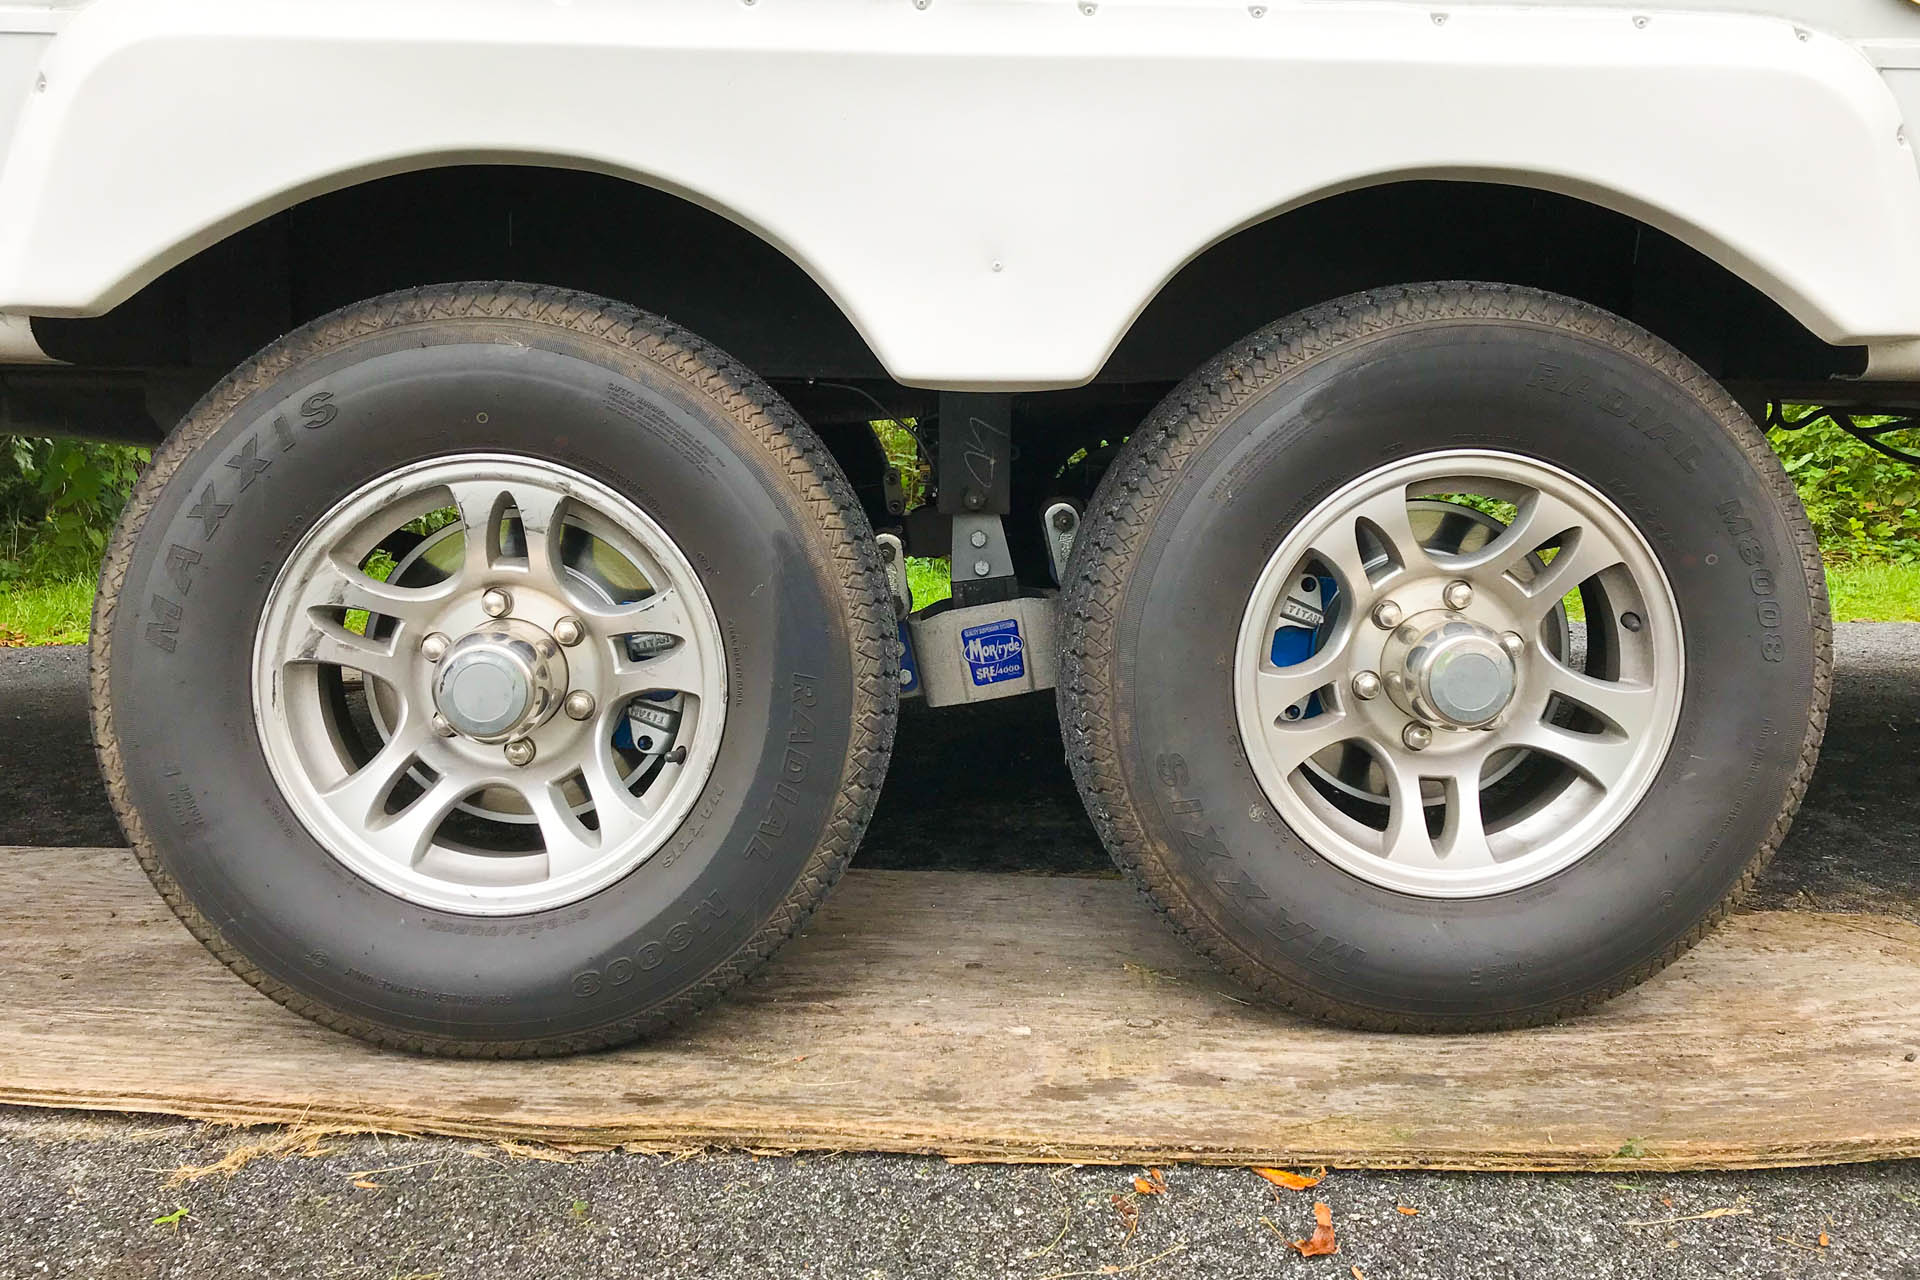
Enter Performance Trailer Braking. These folks do one thing primarily – convert standard electric trailer drum brakes to ‘electric over hydraulic’ disc brakes. (ok, a lot more really useful things, but that’s their main focus). These people ROCK! Michael and Kelly Barnett run a top notch service. They provide top quality materials and give you the option to do it yourself – or get this – have one of their installers COME TO YOU!
Now I (Mike) may be mechanically inclined but I just had no experience whatsoever, and these IMHO were too important to “YouTube It”. So we elected to have them do the installation. And they have no problem with, and actually encourage, “looking over their shoulder”! I love to learn, I like to know how to do things. They love ‘teaching’! The more you know how to do for yourself, the more you can get yourself out of a jam somewhere down the road.
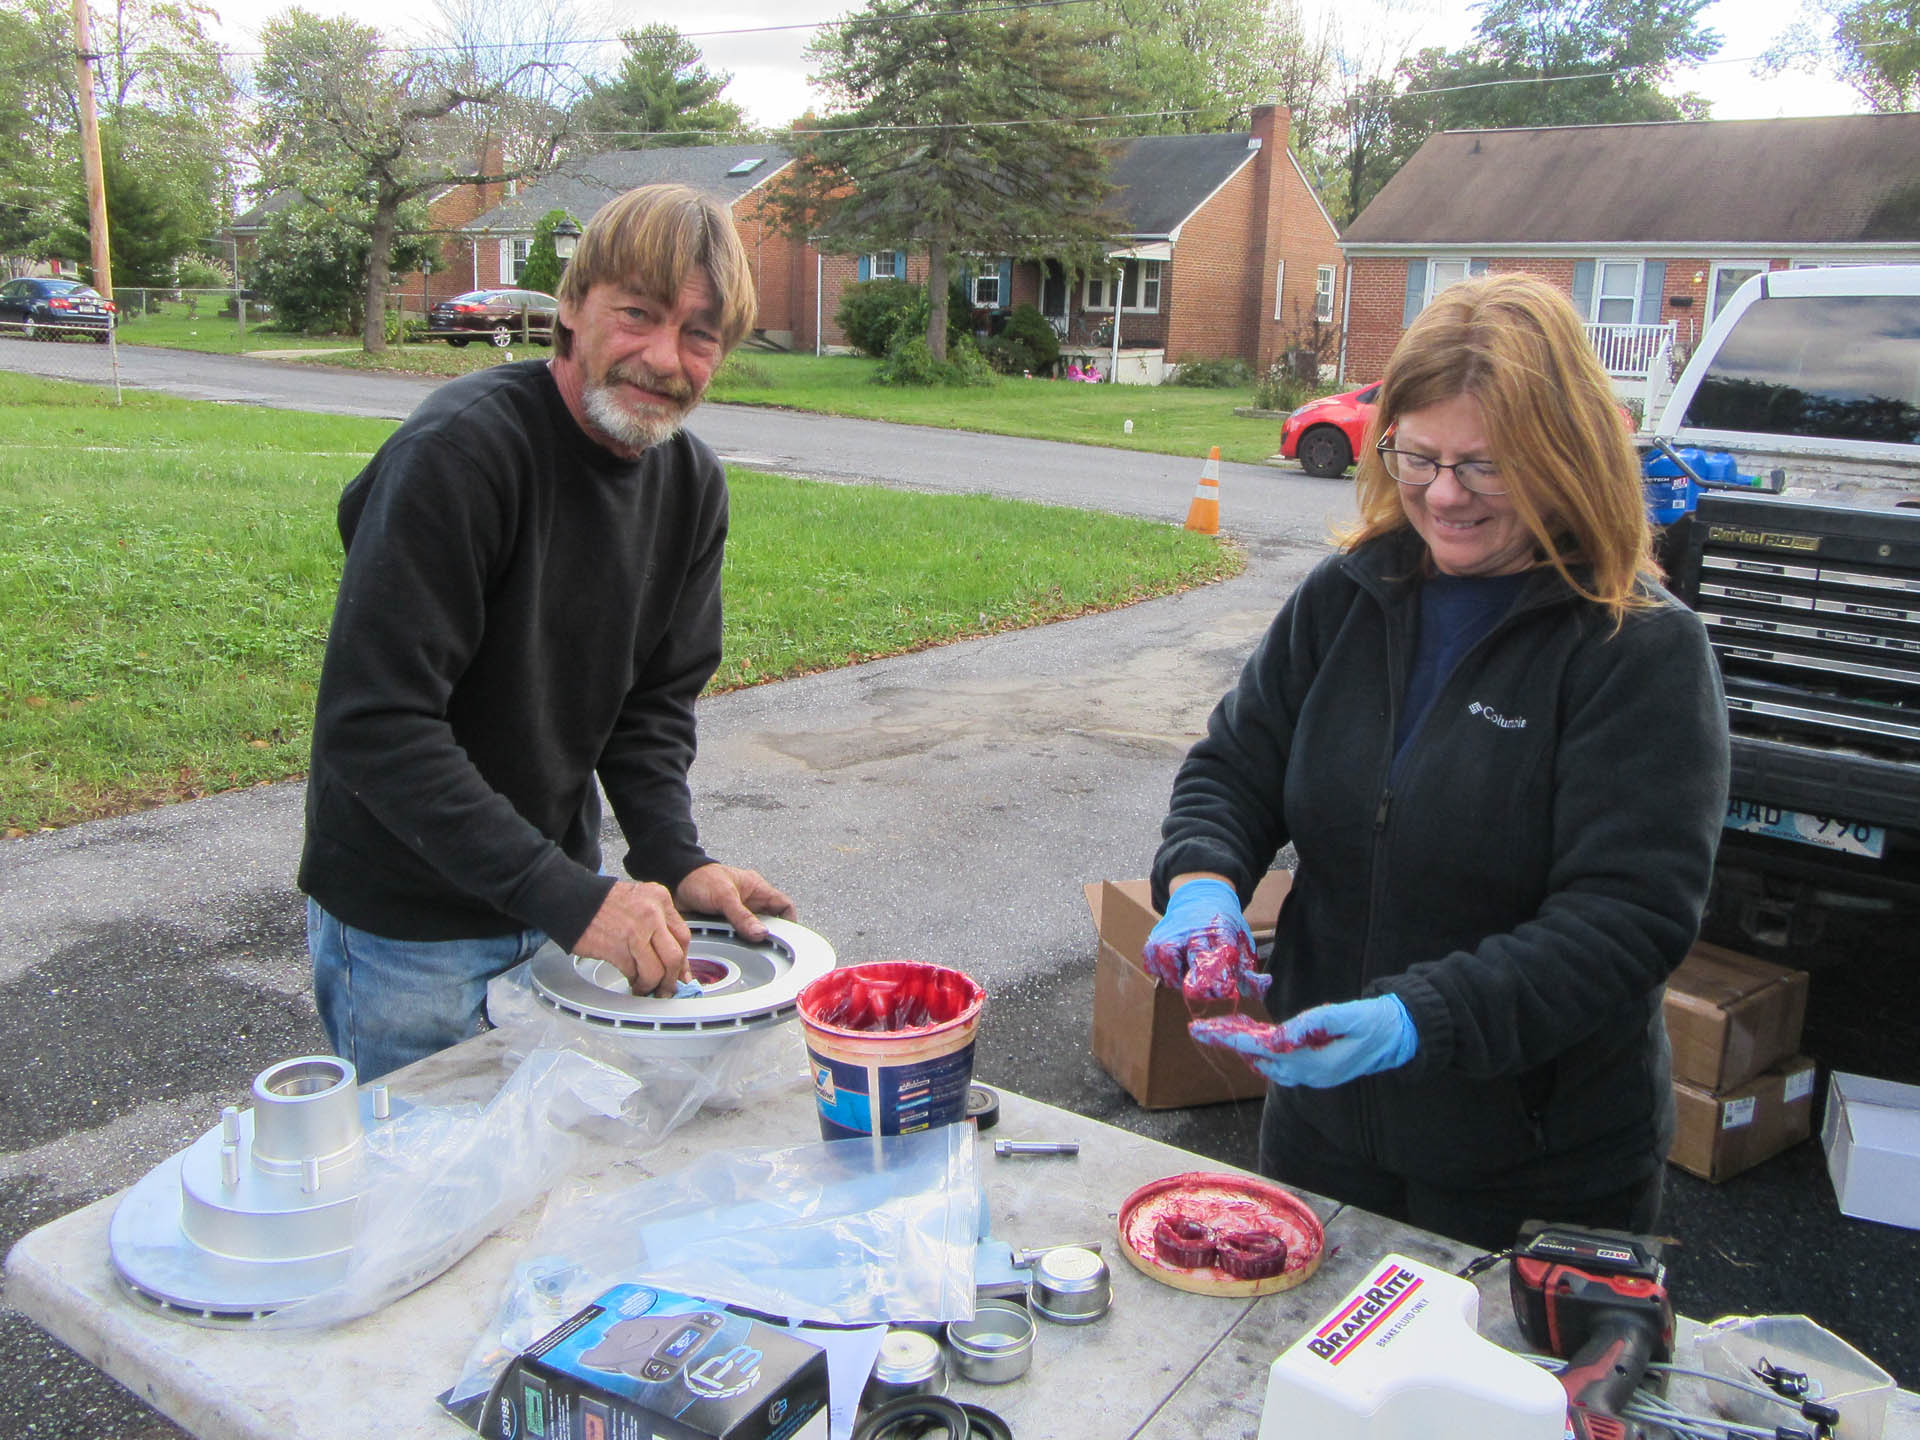
John and Barbara showed up early on a Saturday morning and by Saturday afternoon, we had completely stripped the old brakes off and had a brand new working system in place. They couldn’t have been more friendly and professional. Seriously, we just felt like ‘old friends’ right from the get go!
So, some pictures to follow. Note: (Shameless Self Promotion): Performance Trailer Braking has a Referral Program. IF you happen to stumble on this post and decide to eventually do this, from them … please mention us. YOU get a $50.00 discount, and we get some bucks too. But … honestly, truly … that doesn’t matter to us. They are great people with a top quality product. And … yes, I did ask several local shops in my area what it would cost – these folks were at LEAST half the cost and usually LESS than half the cost of what I could find in Baltimore that were even willing to do the work.
It’s only been one day as of this writing but, we took it out for a long test run and honestly, OMG what a difference. It took about 20 minutes at a local empty park and ride facility to completely fine tune the system but … once done … the truck and trailer truly feel “at one with each other”. Neither one feeling like one or the other is dominant. We tried city driving, we tried highway driving. Never once did I have to try to ‘work the controller’. And in a panic stop (yeah we kinda tried that too) .. yup – yer gonna stop like you’ve never believed you could stop before!
John and Barbara setting up shop on a table in our driveway
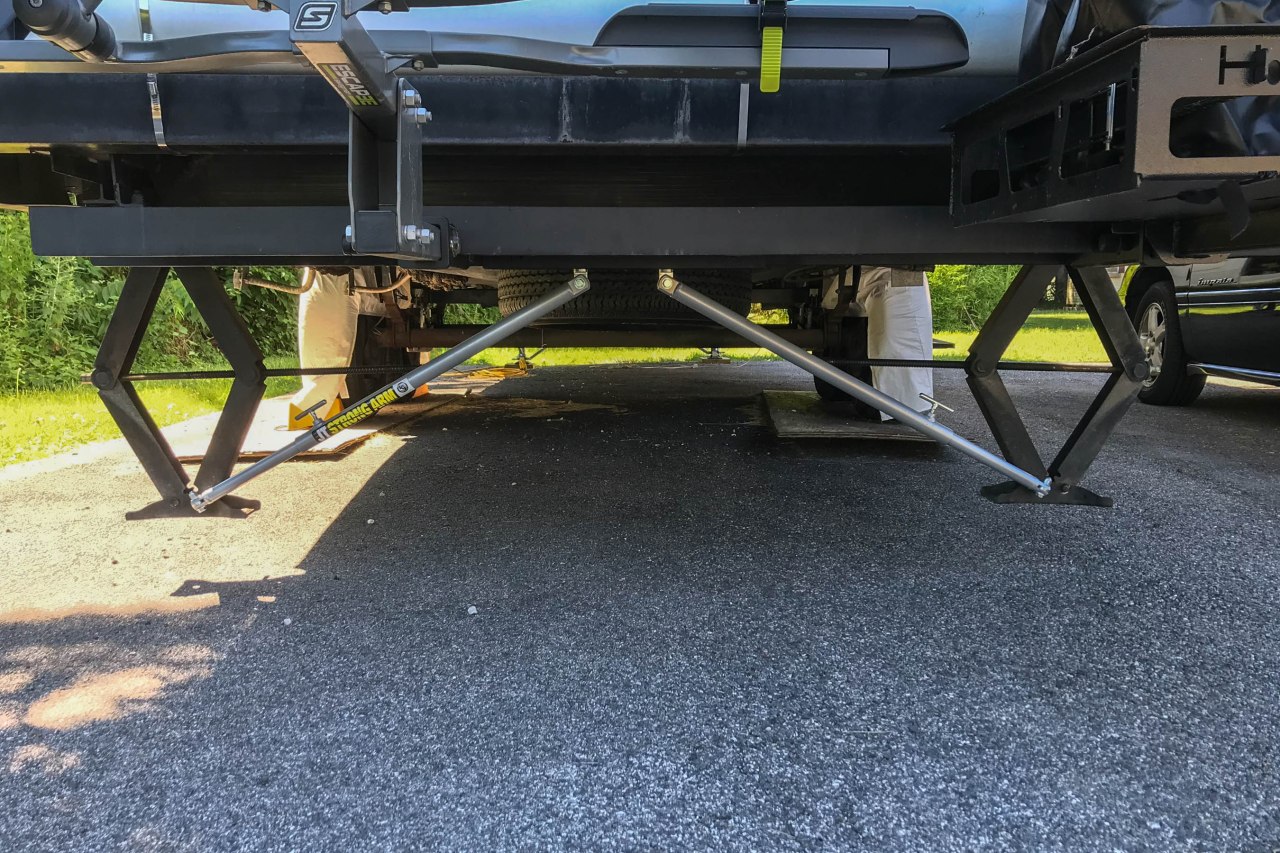
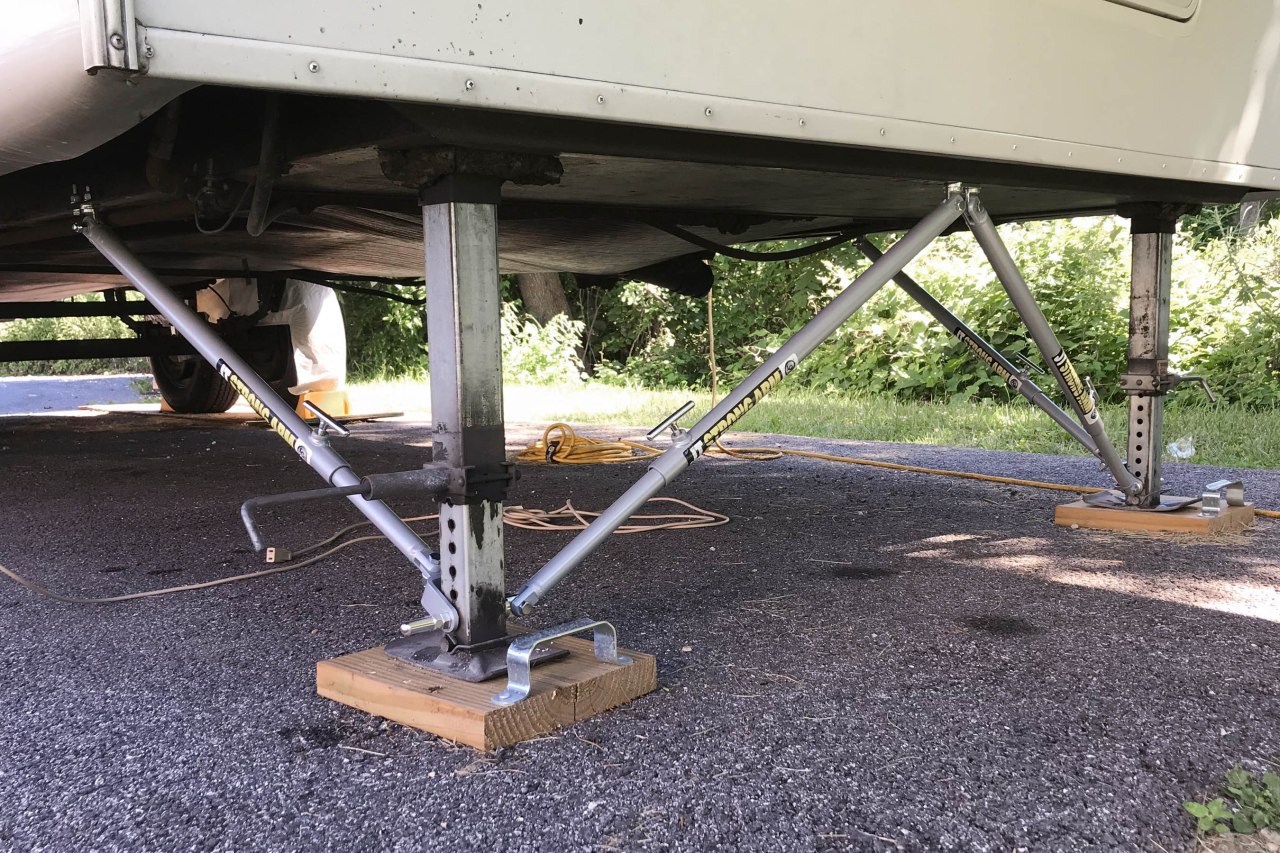
Anyone who’s ever owned a 5th wheel has almost assuredly had to deal with a little bit of ‘creep’ – and no, I don’t mean the weird guy across from your site that just stares at ya all day.
We used to call the noise it made in ours “Lucy” after Lucy in the Sky with Diamonds … ok, weird, but it worked for us. There’s this one part of the song where it almost sounds like a ‘moan’ …
So, we researched a lot of the add on stabilizers, read review after review, and we considered king pin stabilizers too. The JT’s just had so many good reviews, and we didn’t want to give up more space to storing a kingpin stabilizer – so we went with them. Here’s a link: JT’s Strong Arm
We just finished our first major trip with them in place and OMG what a difference! In our humble opinion these are worth every dime (and blood, sweat, and tears installing them)! Rock solid is all we can say.
If you’re mechanically inclined and don’t mind spending time under your rig drilling thru steel (which is a challenge all by itself if you don’t know how), one can install these yourself. They come with pretty much everything you need hardware wise, more than enough actually. We only ran into one hiccup in that the rear stabilizers needed to attach to a steel horizontal surface within a certain position range. We didn’t have that. I called the company and they said they had several video’s online on installation and installation tips, so I checked it out. They showed a simple idea of using a piece of angle iron added across the frame. I didn’t quite have that, but previously we had added a custom rear hitch receiver system. I was able to attach a piece of angle iron to that in order to create a flat horizontal surface for the rear ones. They have a lot of other ideas for a lot of different situations and their tech support isn’t bad.
The bottom line is now we’re on stable ground with no shakes! We will miss Lucy though 🙂
This is the angle iron piece I had to add on the rear.
Cape Cod is much bigger than you would think looking at it on a map! It is shaped like a reverse L and juts out from Massachusetts into the Atlantic Ocean. We stayed close to the middle at Atlantic Oaks Campground. The campground is very nice. The sites aren’t large, but they are spaced well and there are a good many trees for shade. They also had surprisingly good wi-fi.
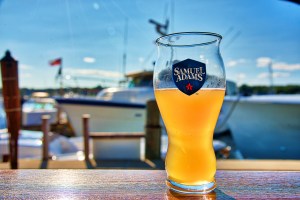
The Cape Cod Rail Trail runs directly behind the campground and can be accessed from the campground. This is a great trail for bike riding, paved well and relatively flat. From the campground it is a short walk or ride on the trail to Arnold’s Lobster and Clam Bar, a casual restaurant with good food and a great beer selection.
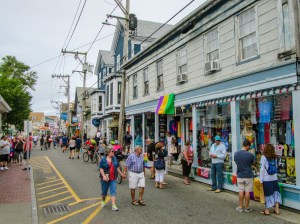
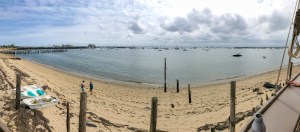
From the campground we took a day trip to Provincetown at the northern end of Cape Cod. P-town is a fun place to visit! The main tourist area is lined with shops and restaurants for many blocks! One of our first stops was a food court with a bar and deck right on the water for lunch. The food was good, but the view was what made this special.
After lunch we walked around and visited some of the gift shops. We bought a couple of soy candles and Candi bought a new hat with the birthday money from her mother (Thanks, Mom!).
Of course, all that walking made us hungry again! We found a place that had great burgers and seats right on the street so we could watch the other tourists stroll past.
The next day it was supposed to rain, so we took advantage of what we thought would be a down day to find a local RV dealer and pick up a new potable water cap to replace the one that had somehow ‘disappeared.’
Martha’s Vineyard is an island off of Massachusetts that is only accessible by plane or boat. Since we were nearby in Cape Cod we decided to take a ferry and see what all the fuss is about! We took Hy-Line Cruises high speed ferry from Hyannis.
The round-trip ferry takes you to Oak Bluffs in Martha’s Vineyard. From what we saw, this is the party spot on the island and there are a lot of restaurants and bars here. Since it was early in the morning when we got there and we knew we’d be back to take the ferry that evening, we decided to see other areas on the island first.
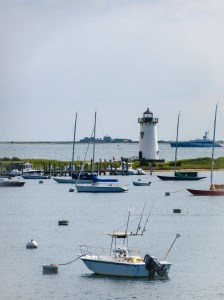
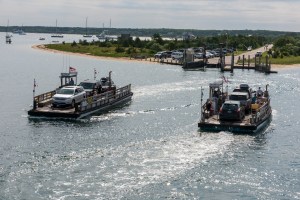
We had researched the best way to see the island and found information on the VTATransit website that showed an example of a day trip and how to get around. We followed this itinerary and it worked out really well. We caught a bus to Edgartown and spent some time walking around there. There are several restaurants and gift shops there, but we thought the best spot in this town was Edgartown Memorial Wharfwhere we spent some time taking pictures and watching the activity on the water. One of most fascinating things was what we thought might be the world’s shortest ferry!
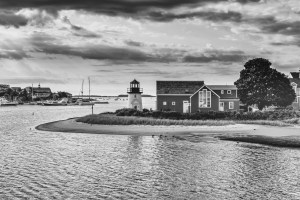
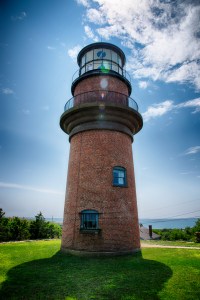
Next, we hopped back on a bus and headed for Aquinnah and the Cliffs of Gay Head. The cliffs are stunning, but from here it is difficult to get close to them. There is a walkway to the beach that would have allowed us to get closer, but with only one day to spend on the island we didn’t want to take a couple of hours getting closer. We took pictures from where we were, then went to the Gay Head Lighthouse for more pictures.
Then it was back on the bus to visit Menemsha. This is a small fishing village with a cute old antique store. The area is cute and fun to walk around, but afterward we wished we’d spent the extra time at Gay Head.
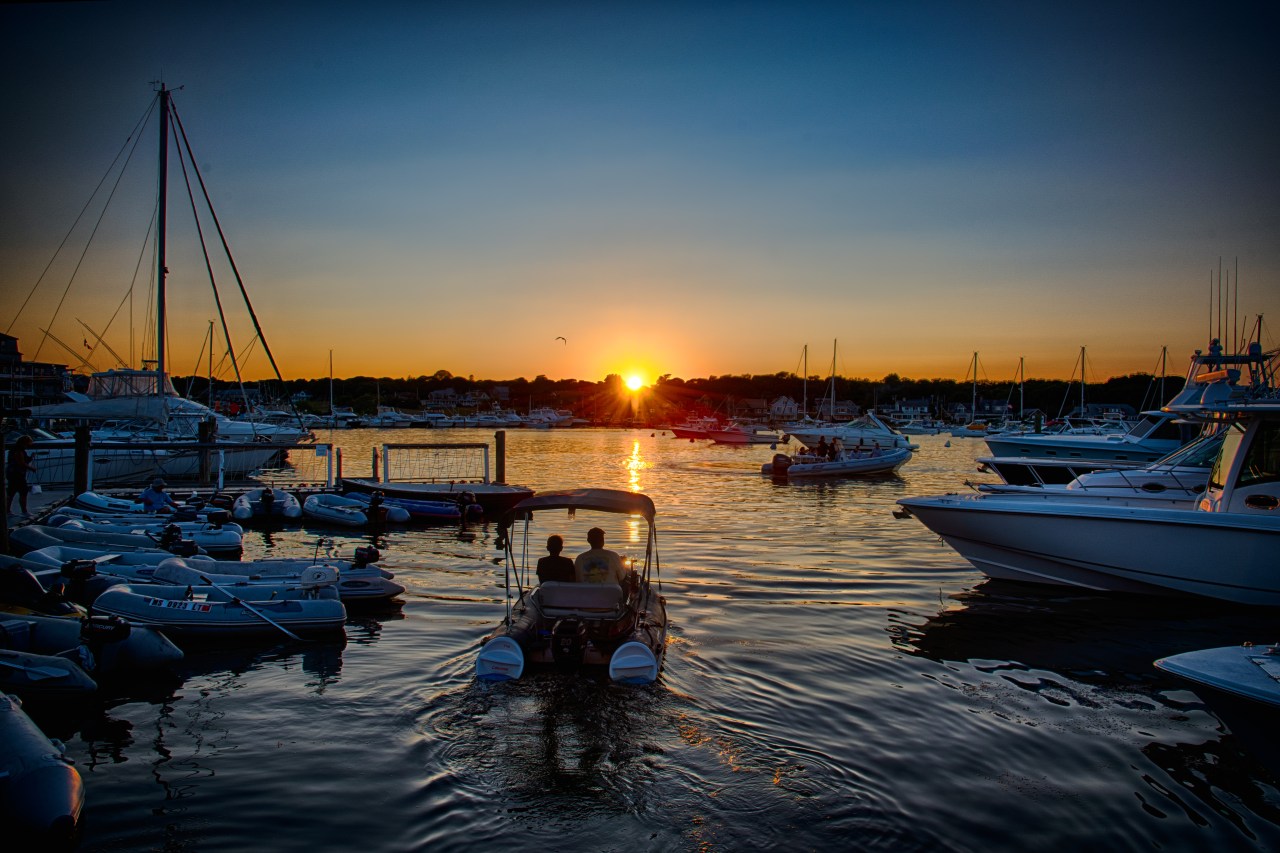
Finally, we took the bus back to Oak Bluffs, which included a quick stop to change buses at Vineyard Haven. We got dinner at Oak Bluffs at The Sand Bar & Grille, a bar and restaurant overlooking the docks. The food was good and we really enjoyed relaxing and watching the crowds. We walked around the docks later and saw a fabulous sunset! After that we treated ourselves to ice cream, then it was back on the ferry for our ride back to Cape Cod. It was a great day and we are finally able to take Martha’s Vineyard off our bucket list!
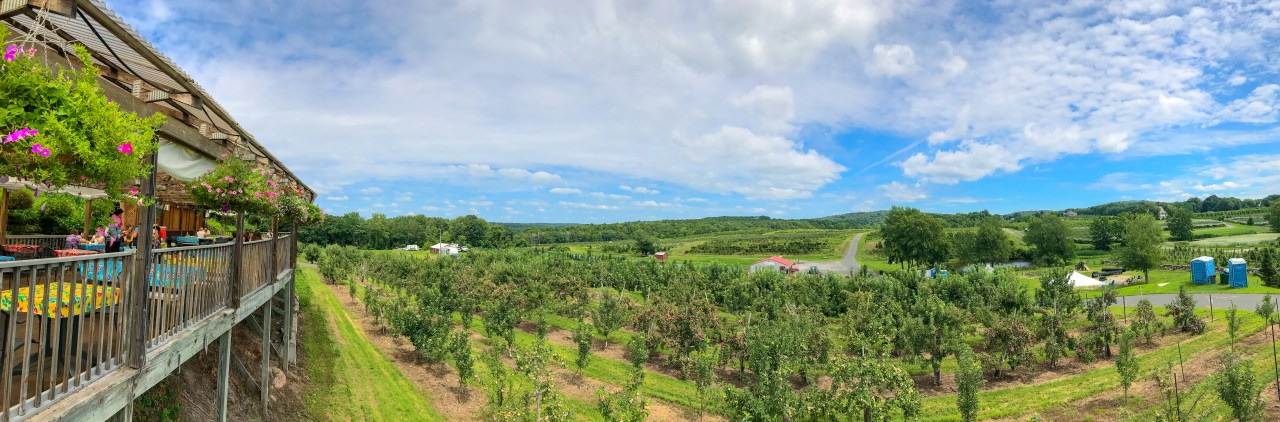
We called ahead to let them know we were planning to stay there. They were very pleasant and made sure we knew how to get there and where to park once we did. We pulled in late morning and were lucky enough to be in time for the breakfast they serve on Sundays during the summer. It is served on a huge deck that overlooks their blueberry fields. We both got the French toast which was very good, but what made it special was the blueberry topping, which is made with blueberries from the farm.
We did a little exploring in the area, then spent a nice night next to the orchards before heading on to Cape Cod the next morning.
We have been hearing and reading about Harvest Hosts for a long time. Harvest Hosts is a network of small companies, such as wineries, farms, and other attractions, that allow RVers to stay on their property overnight at no charge. The membership is $49 annually and when you stay overnight at these places, you are expected to make a purchase to show your appreciation.
We thought it sounded cool and really wanted to try it, but being mostly weekend campers it wasn’t practical. We expect that when we go full-time we will be able to make use of this type of membership for overnight stops on some of our longer drives. Driving from Baltimore to New England for a two-week trip seemed like a good opportunity to test it out. So, we joined Harvest Hosts a few weeks ago and stayed overnight at two different farms on our way to Cape Cod.
The first stop was Wright’s Farm, in Gardiner, NY. Wow, what an initiation into Harvest Hosts! The property was beautiful and the owners were very gracious. Following their instructions, we parked in a large grass field just off the side of a gravel road that runs through their orchards.
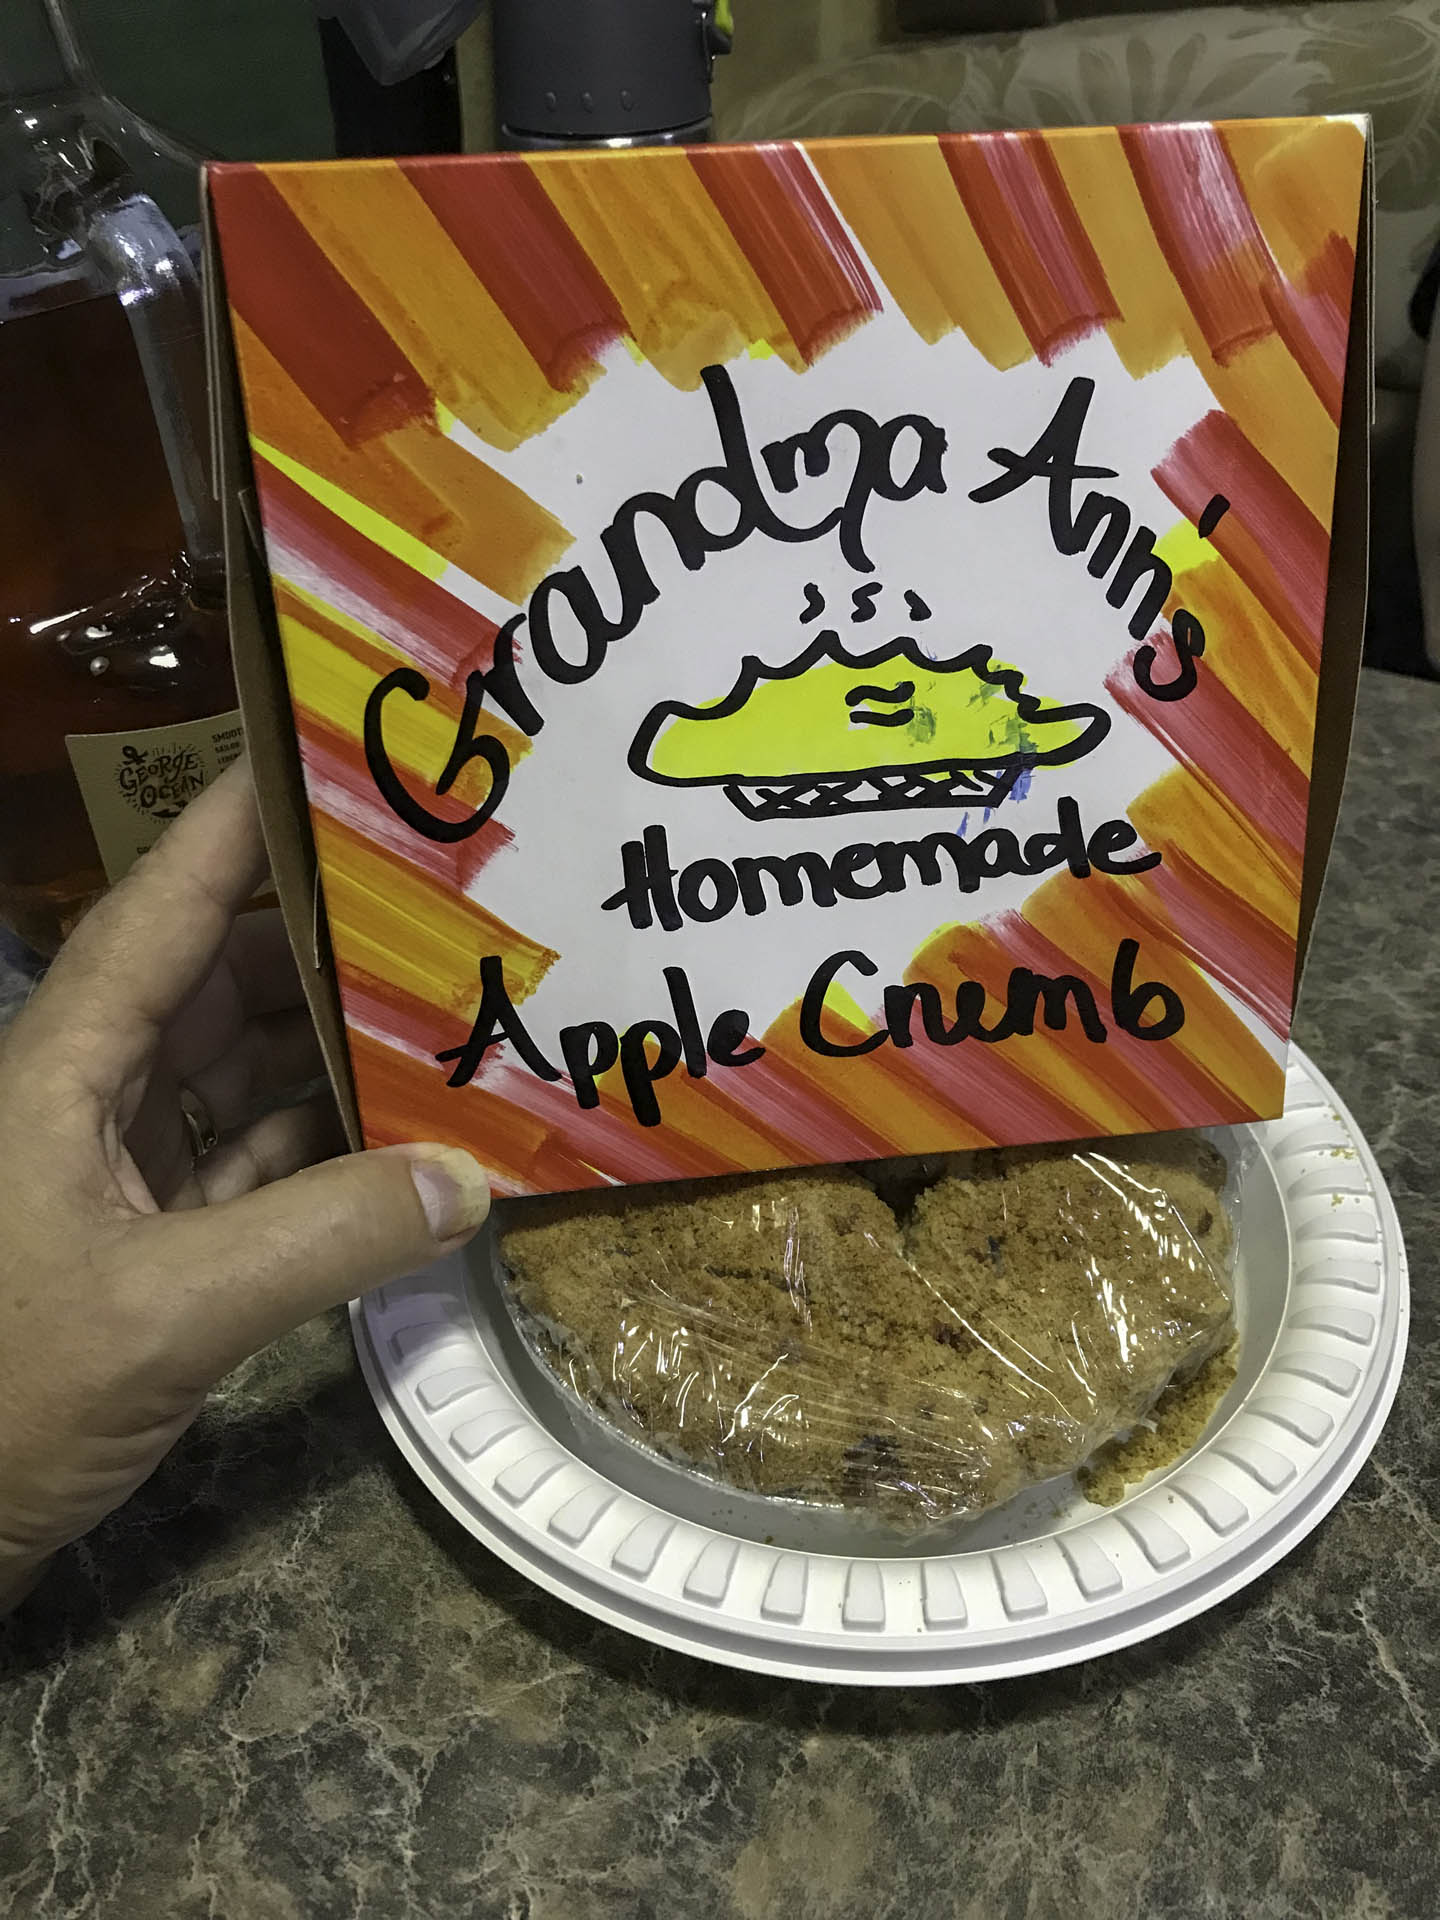
We unhooked our camper to take the truck out to get gas and stopped at their market on the way back. The market is very large, with a lot of their home-grown produce and home-made preserves. They also sell a few local products and home-made pies. We bought some cheese and crackers for a snack, an apple pie for dessert, and some preserves to take home. We had the pie that night and it was wonderful!
After dinner we took a walk around the farm. They had some cute, eclectic displays and we took a lot of pictures.
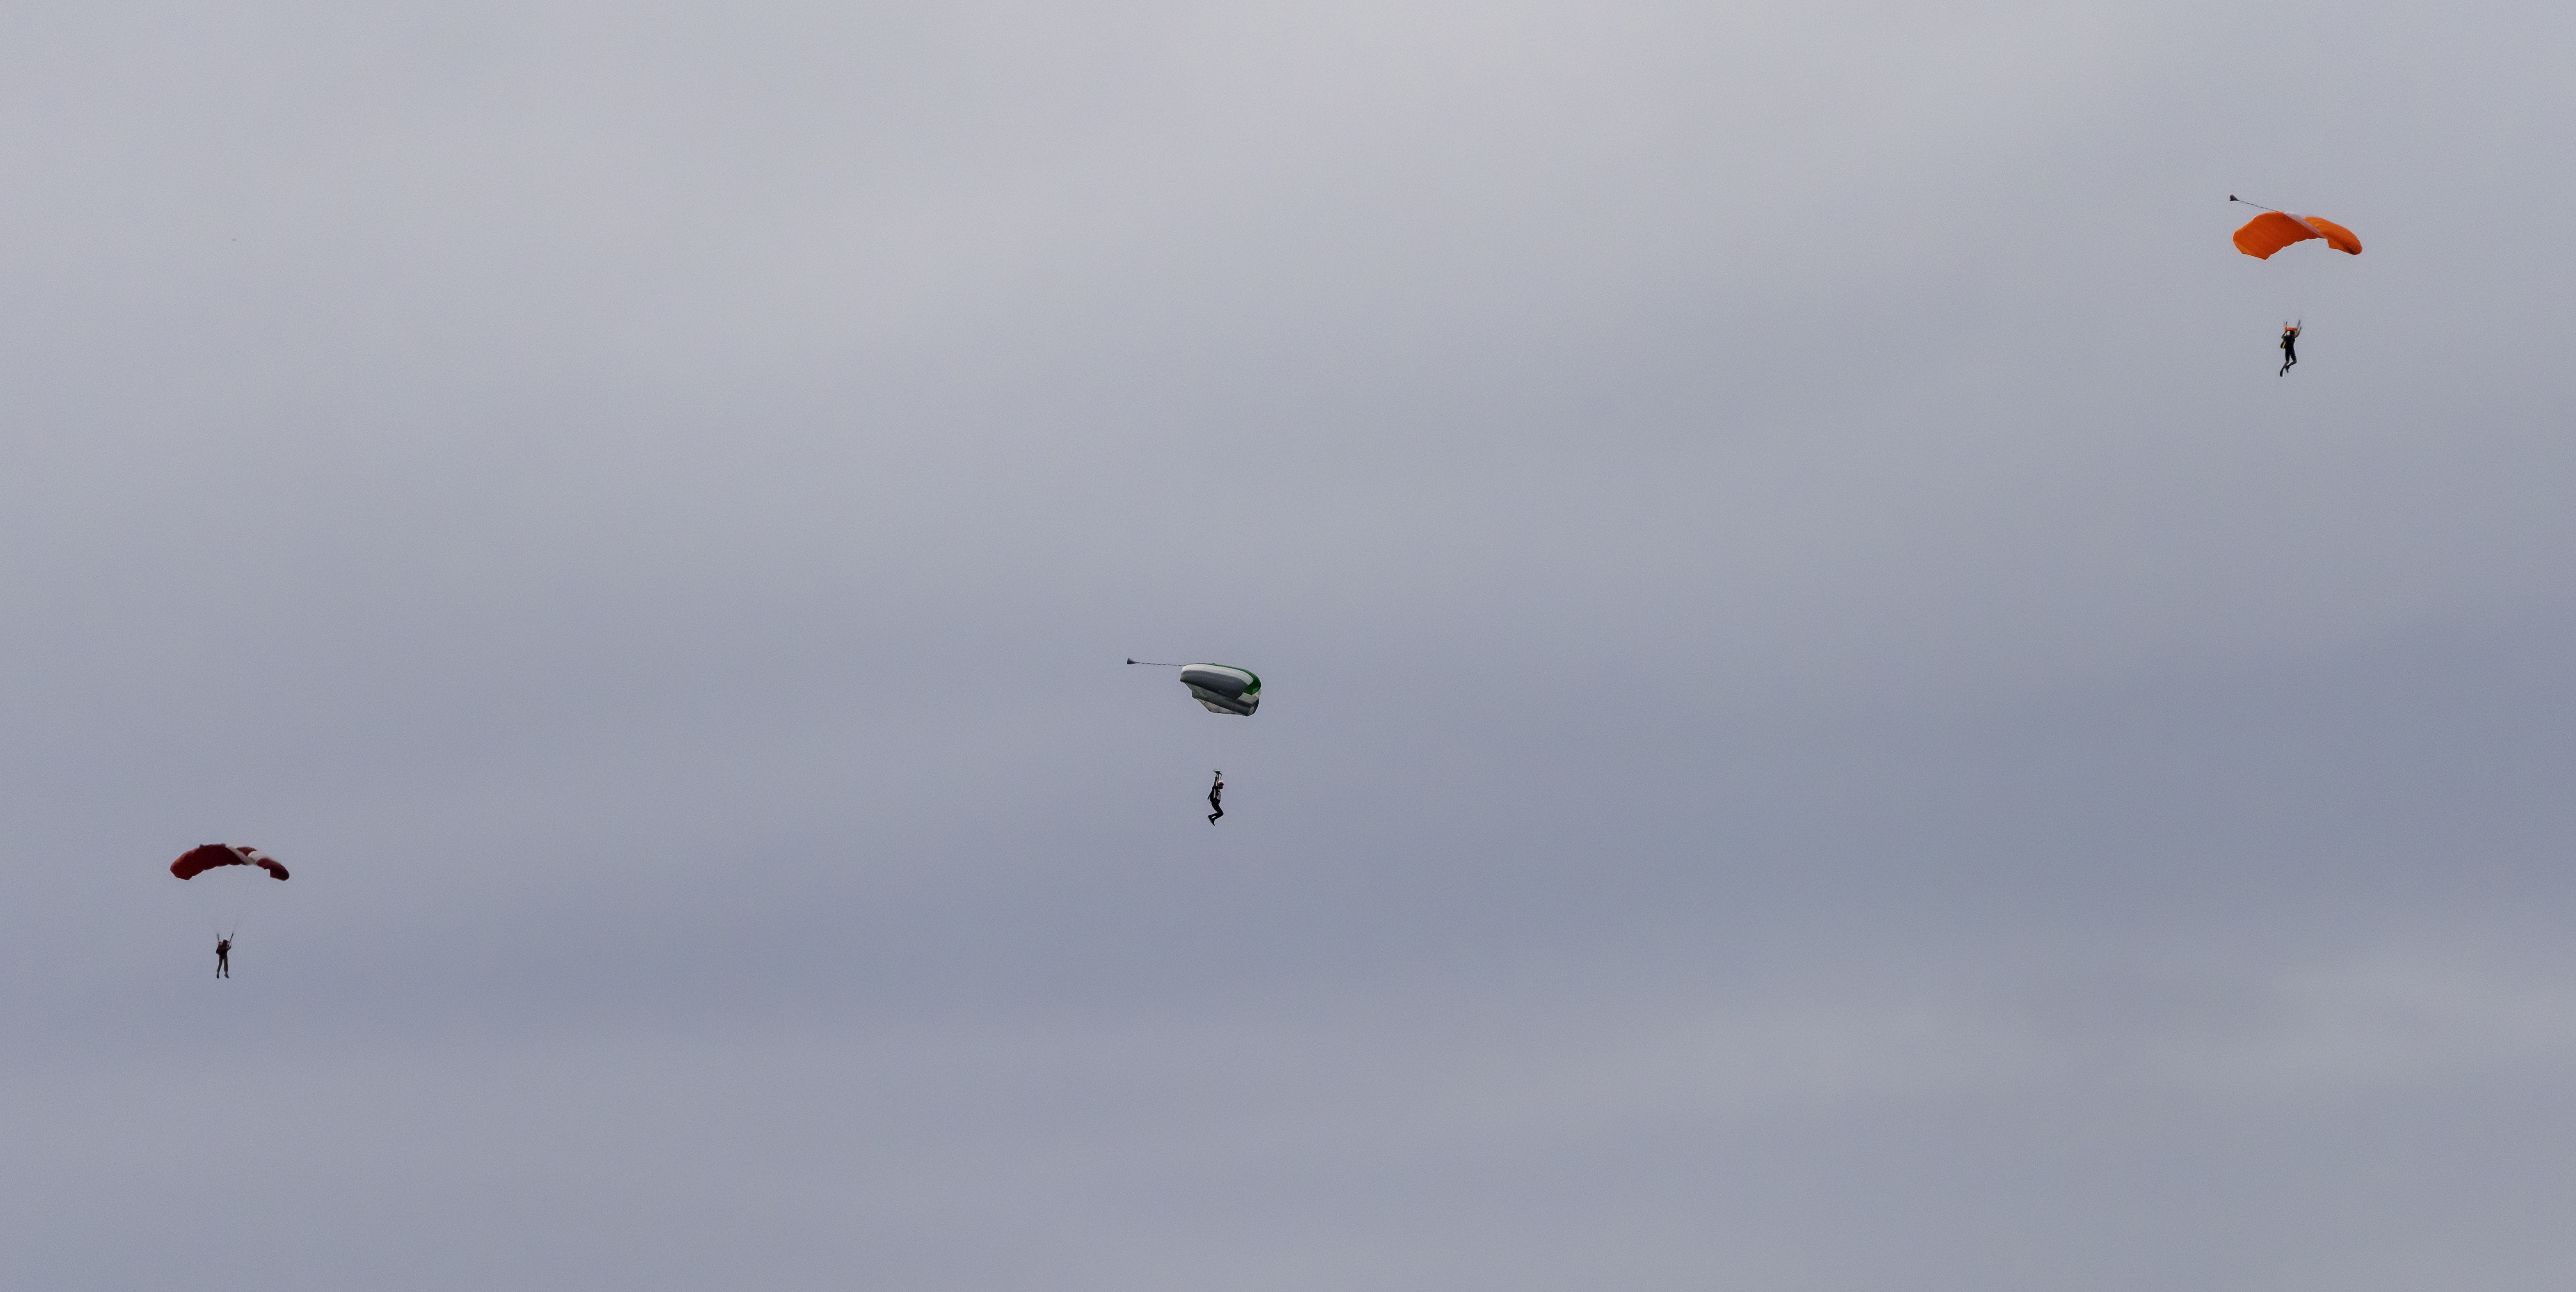
At one point we noticed a loud plane flying very high overhead. A few minutes later we saw about 12 skydivers floating down to earth! It appeared as if they were dancing as they drifted around in the sky and then gradually make their way to the ground.
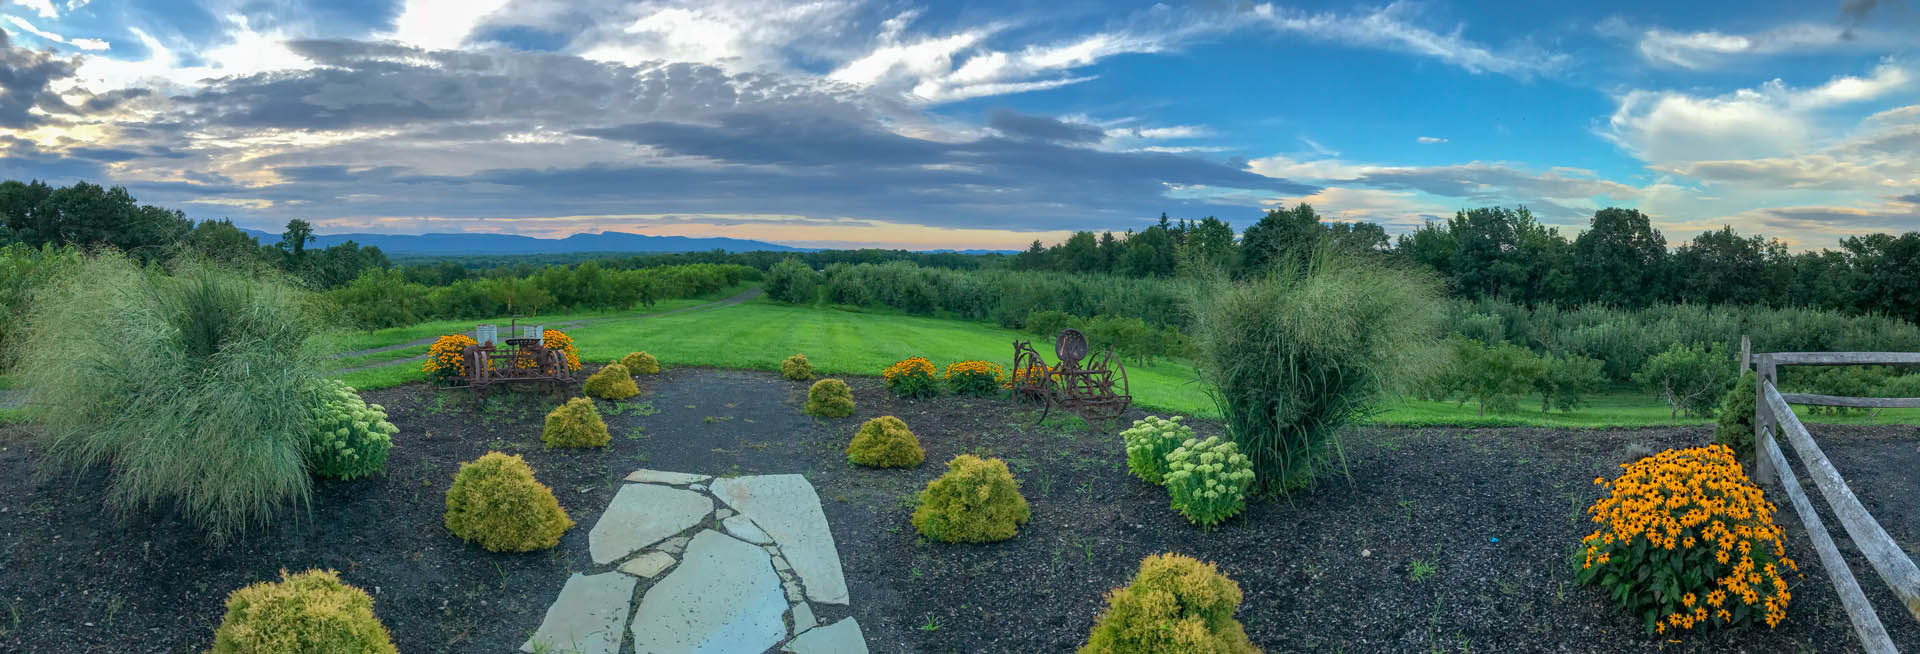
Next one of the owners of the farm drove past and suggested we take a walk up a trail he pointed out. At the top of a hill was a beautiful view of the entire area.
This was such a great experience. We are definitely looking forward to taking advantage of this membership in the future.
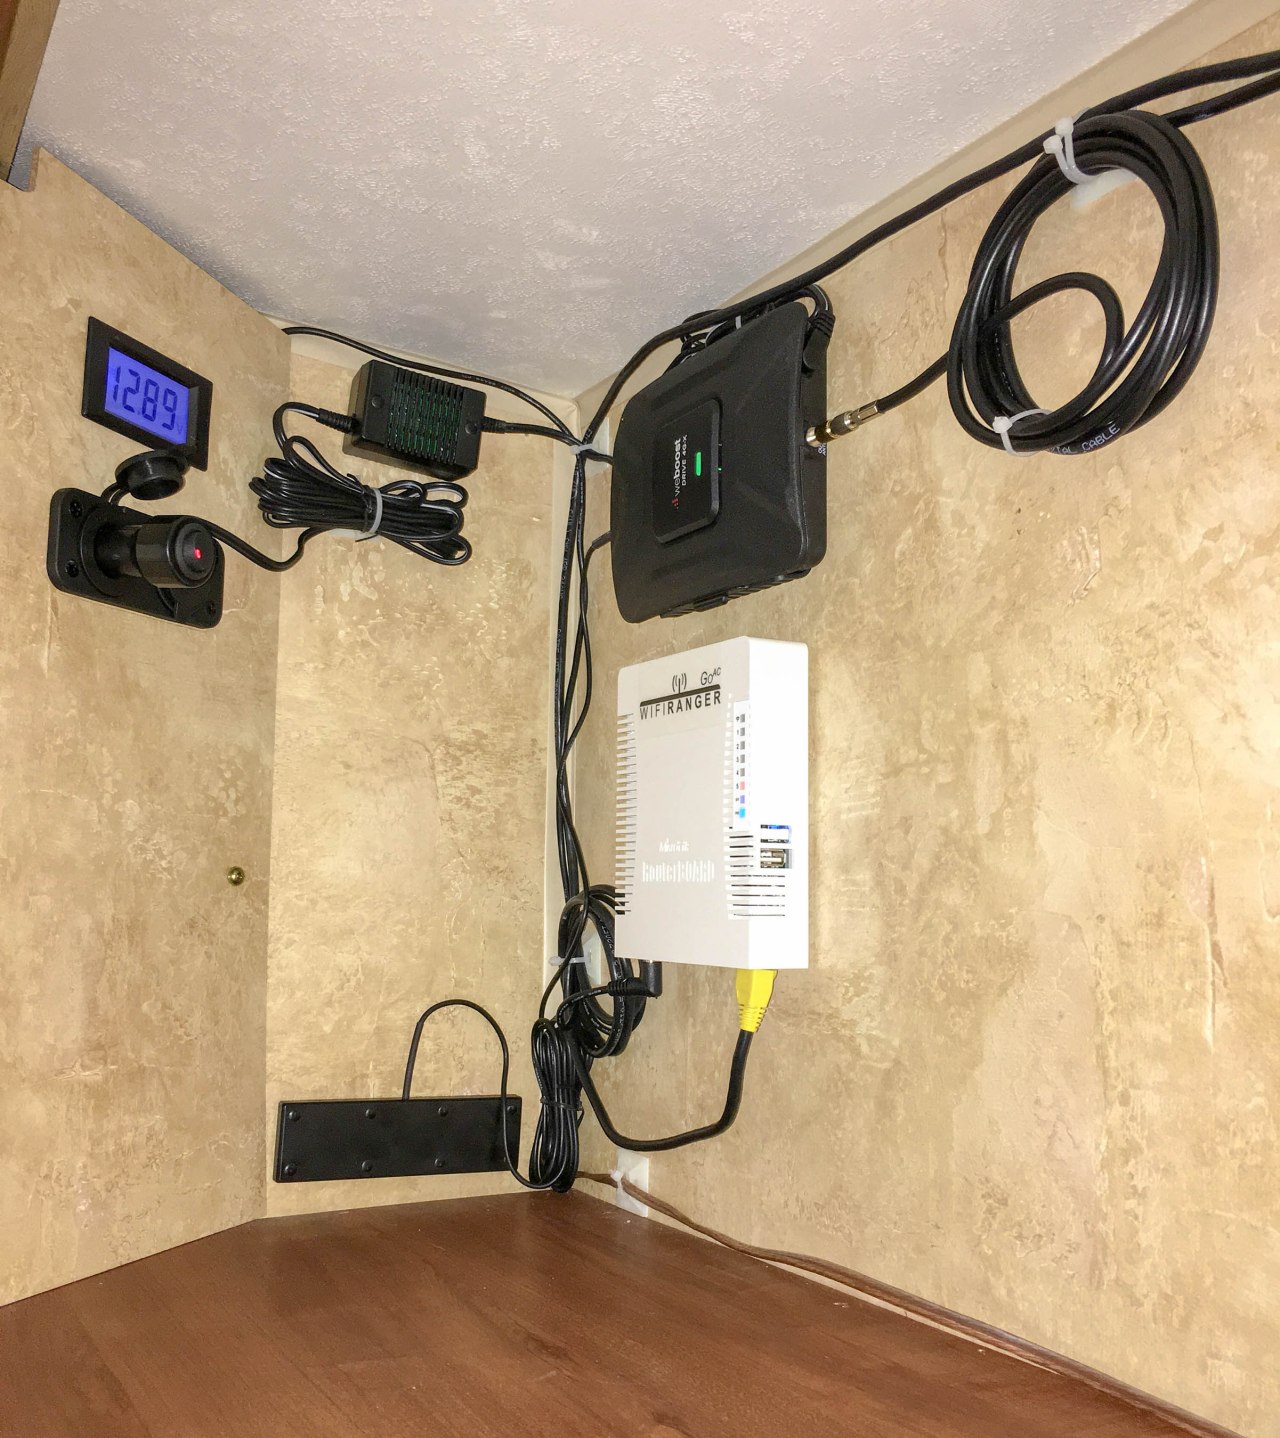
We’d like to start out by just saying THANK YOU to the Technomads Chris and Cherie, and their website RVMobileInternet. Without their website, their books, and a variety of social media they host, we’d have been totally lost.
There are many choices and many different solutions. We ended up choosing 2 primary components for the time being:
We will eventually need to get a MiFi/Jet Pack cellular device but we’re not quite ready for that yet.
The installation of these items can be done DIY, but be prepared for a significant amount of work, spending a fair amount of time on your roof, and contorting yourself in various ways to get wiring run and devices installed where you want them. For me though, the ‘thing’ I sweated the most over was ‘how am I going to get wire thru the roof to where I want it?’ I was dreading the idea of drilling holes in our rig. WE GOT LUCKY when a Eureka Moment was realized. We have an FM antenna on our roof almost exactly where the cabinet is and the gear will go! No new holes, just detach the existing antenna, run the wires thru the existing hole, re-attach and re-seal. I did have to drill one new hole to get the wires into the cabinet but that went well and I only sweated that out for a few minutes.
We had been debating for a long time about what to do about our bikes, and a generator.
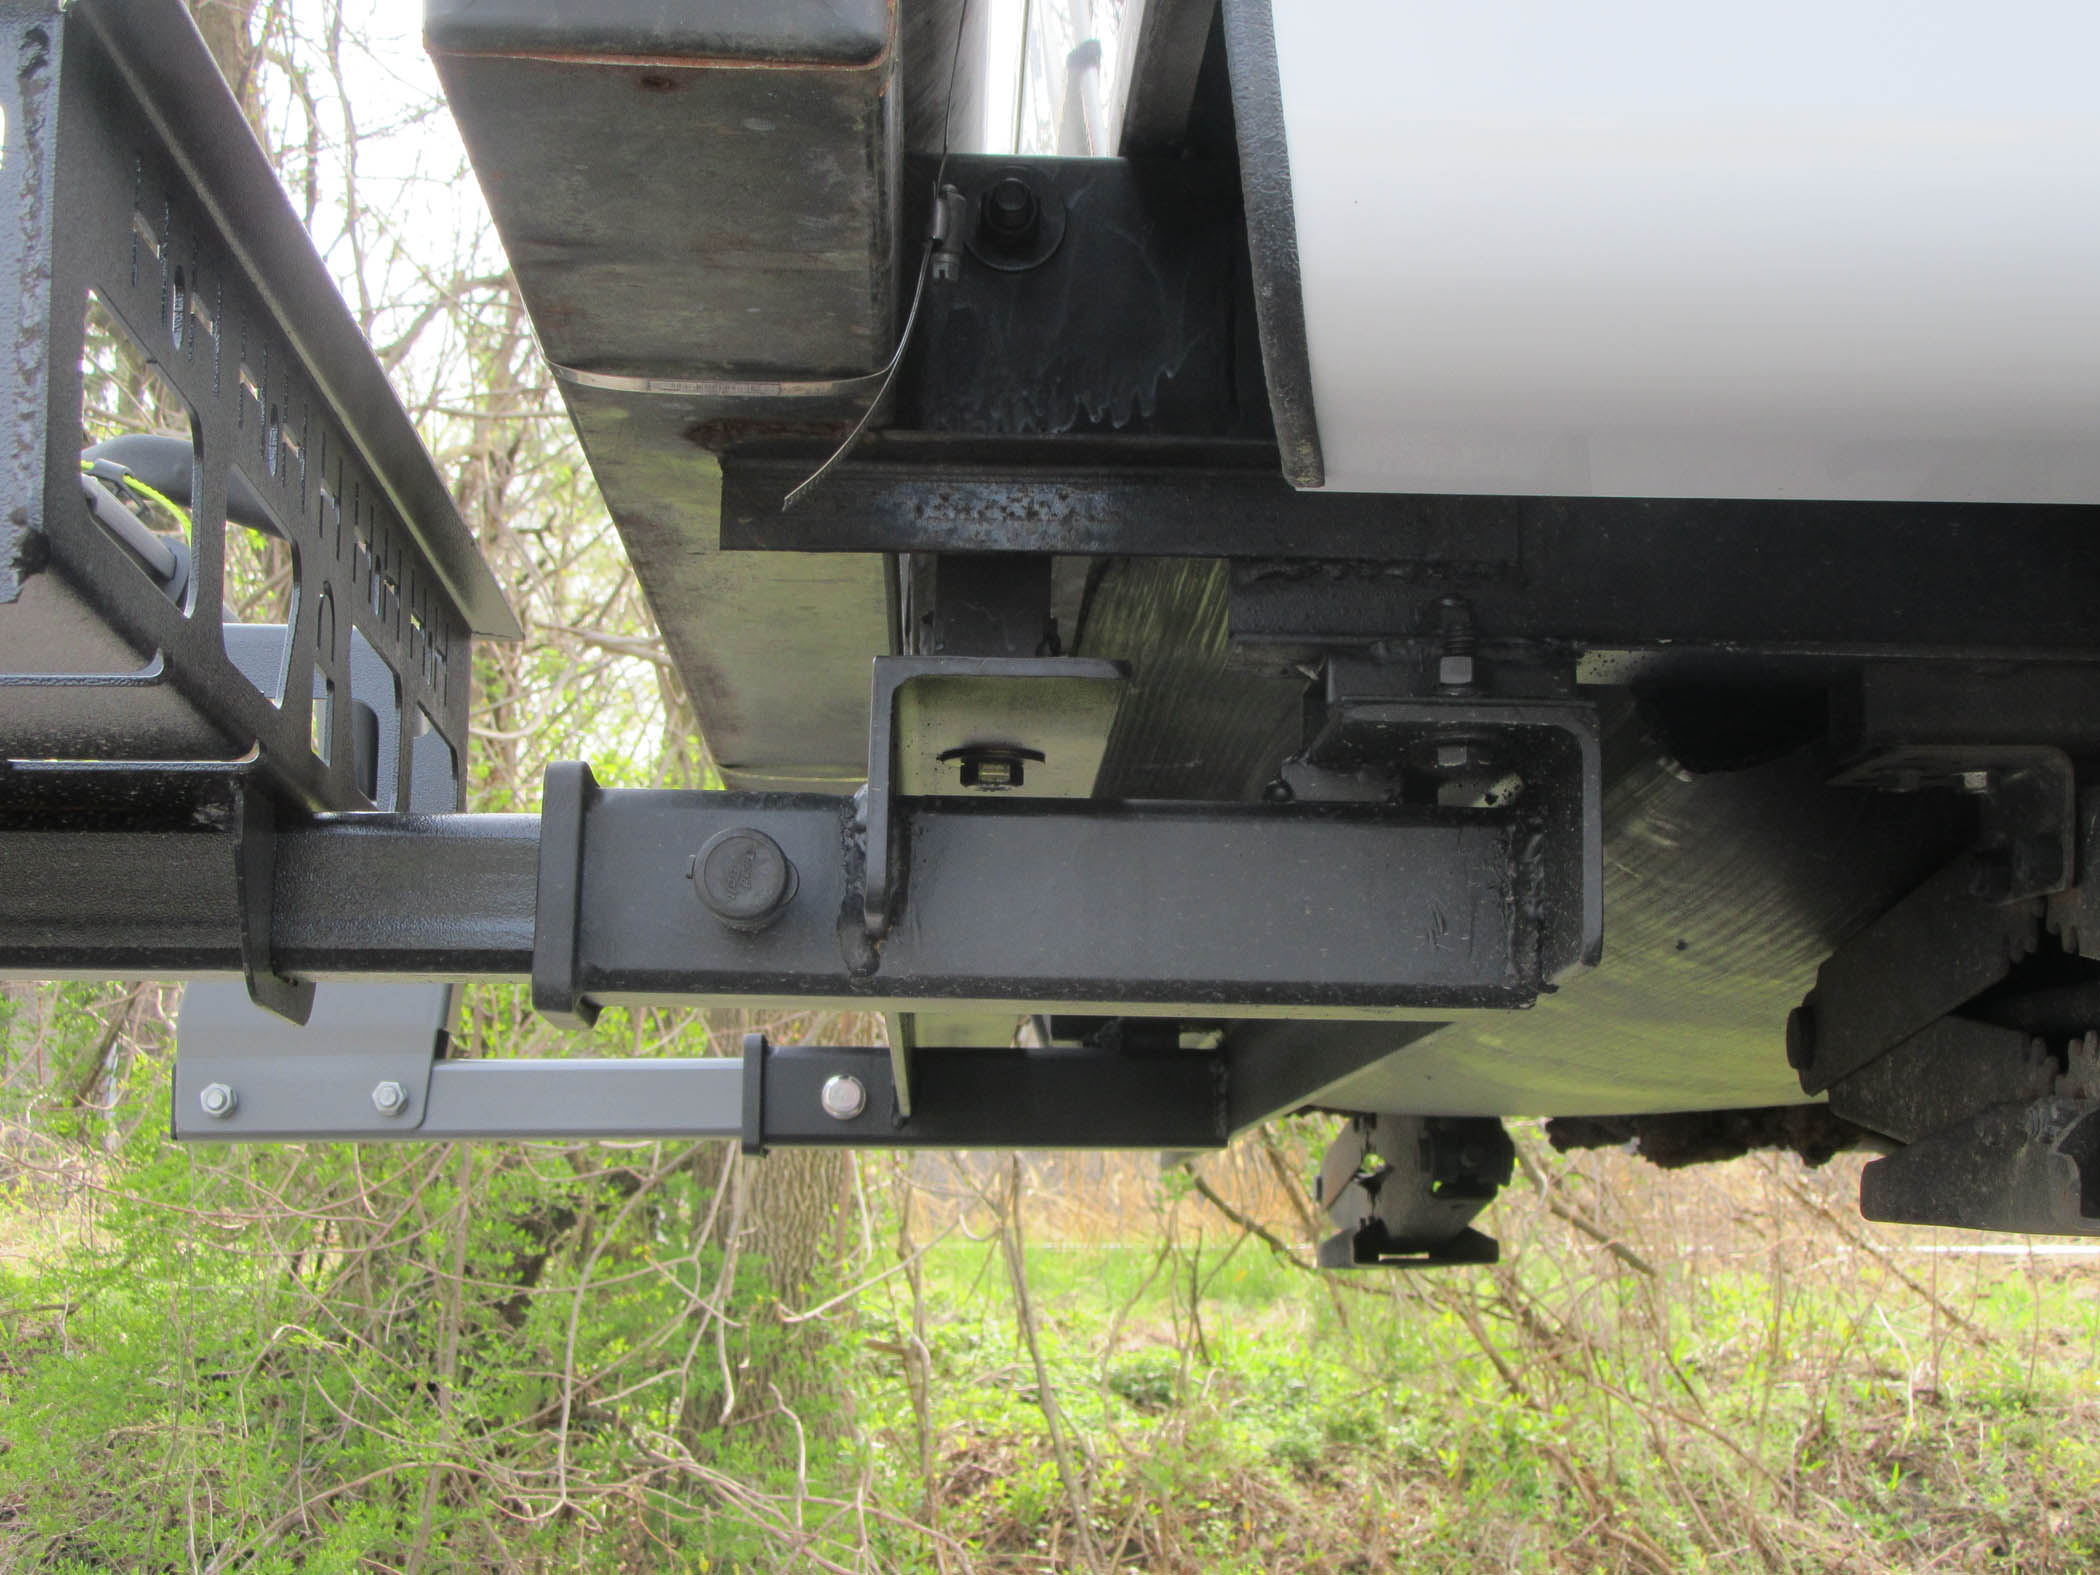
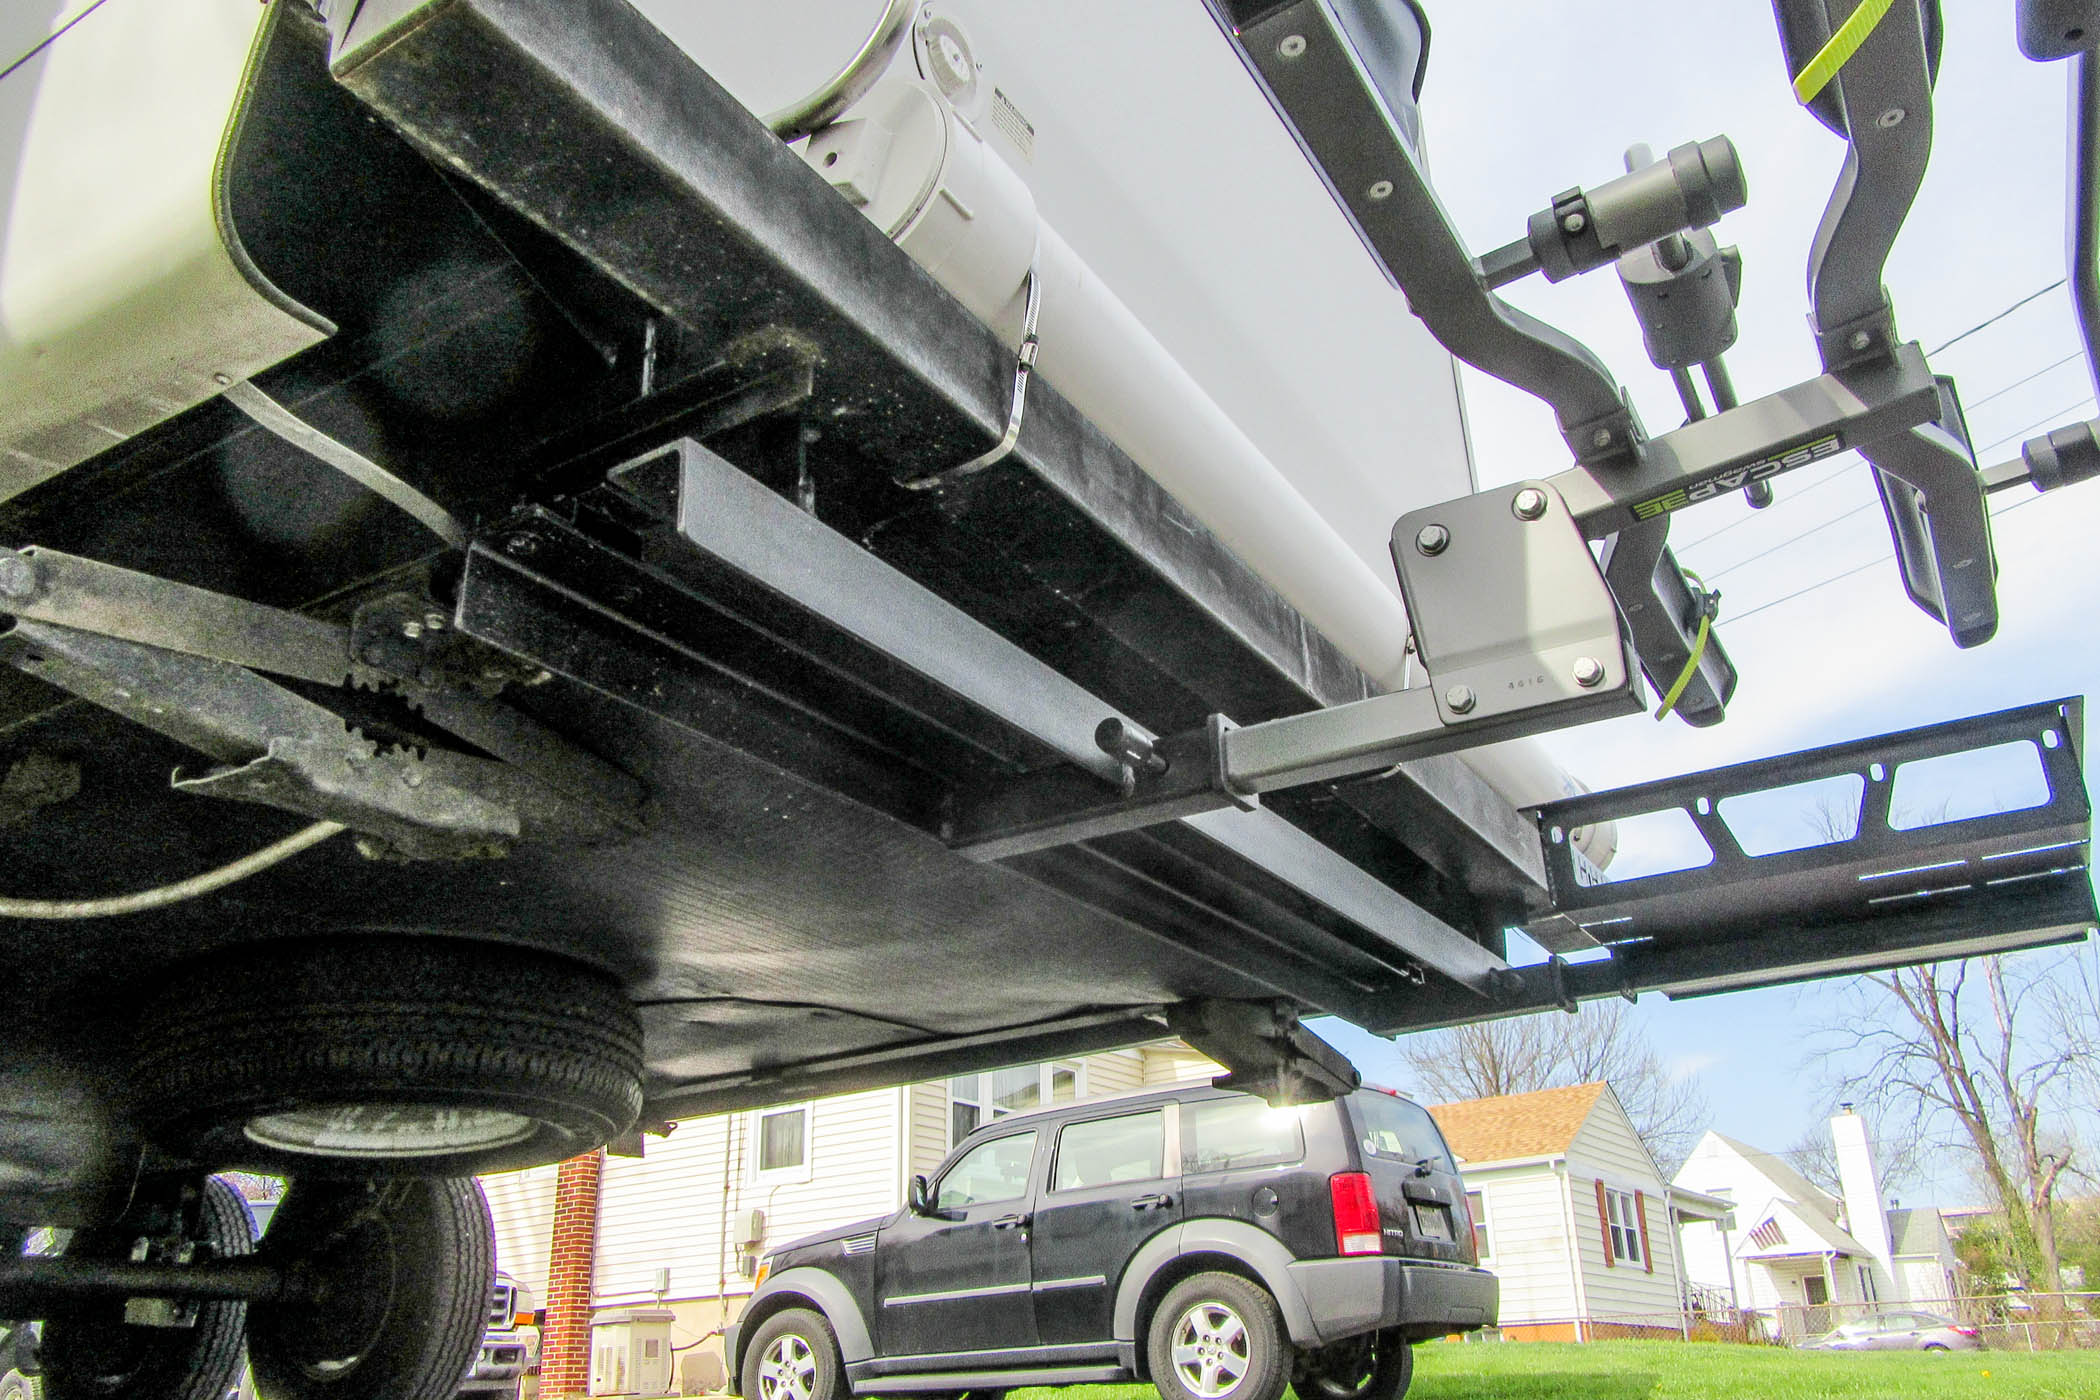
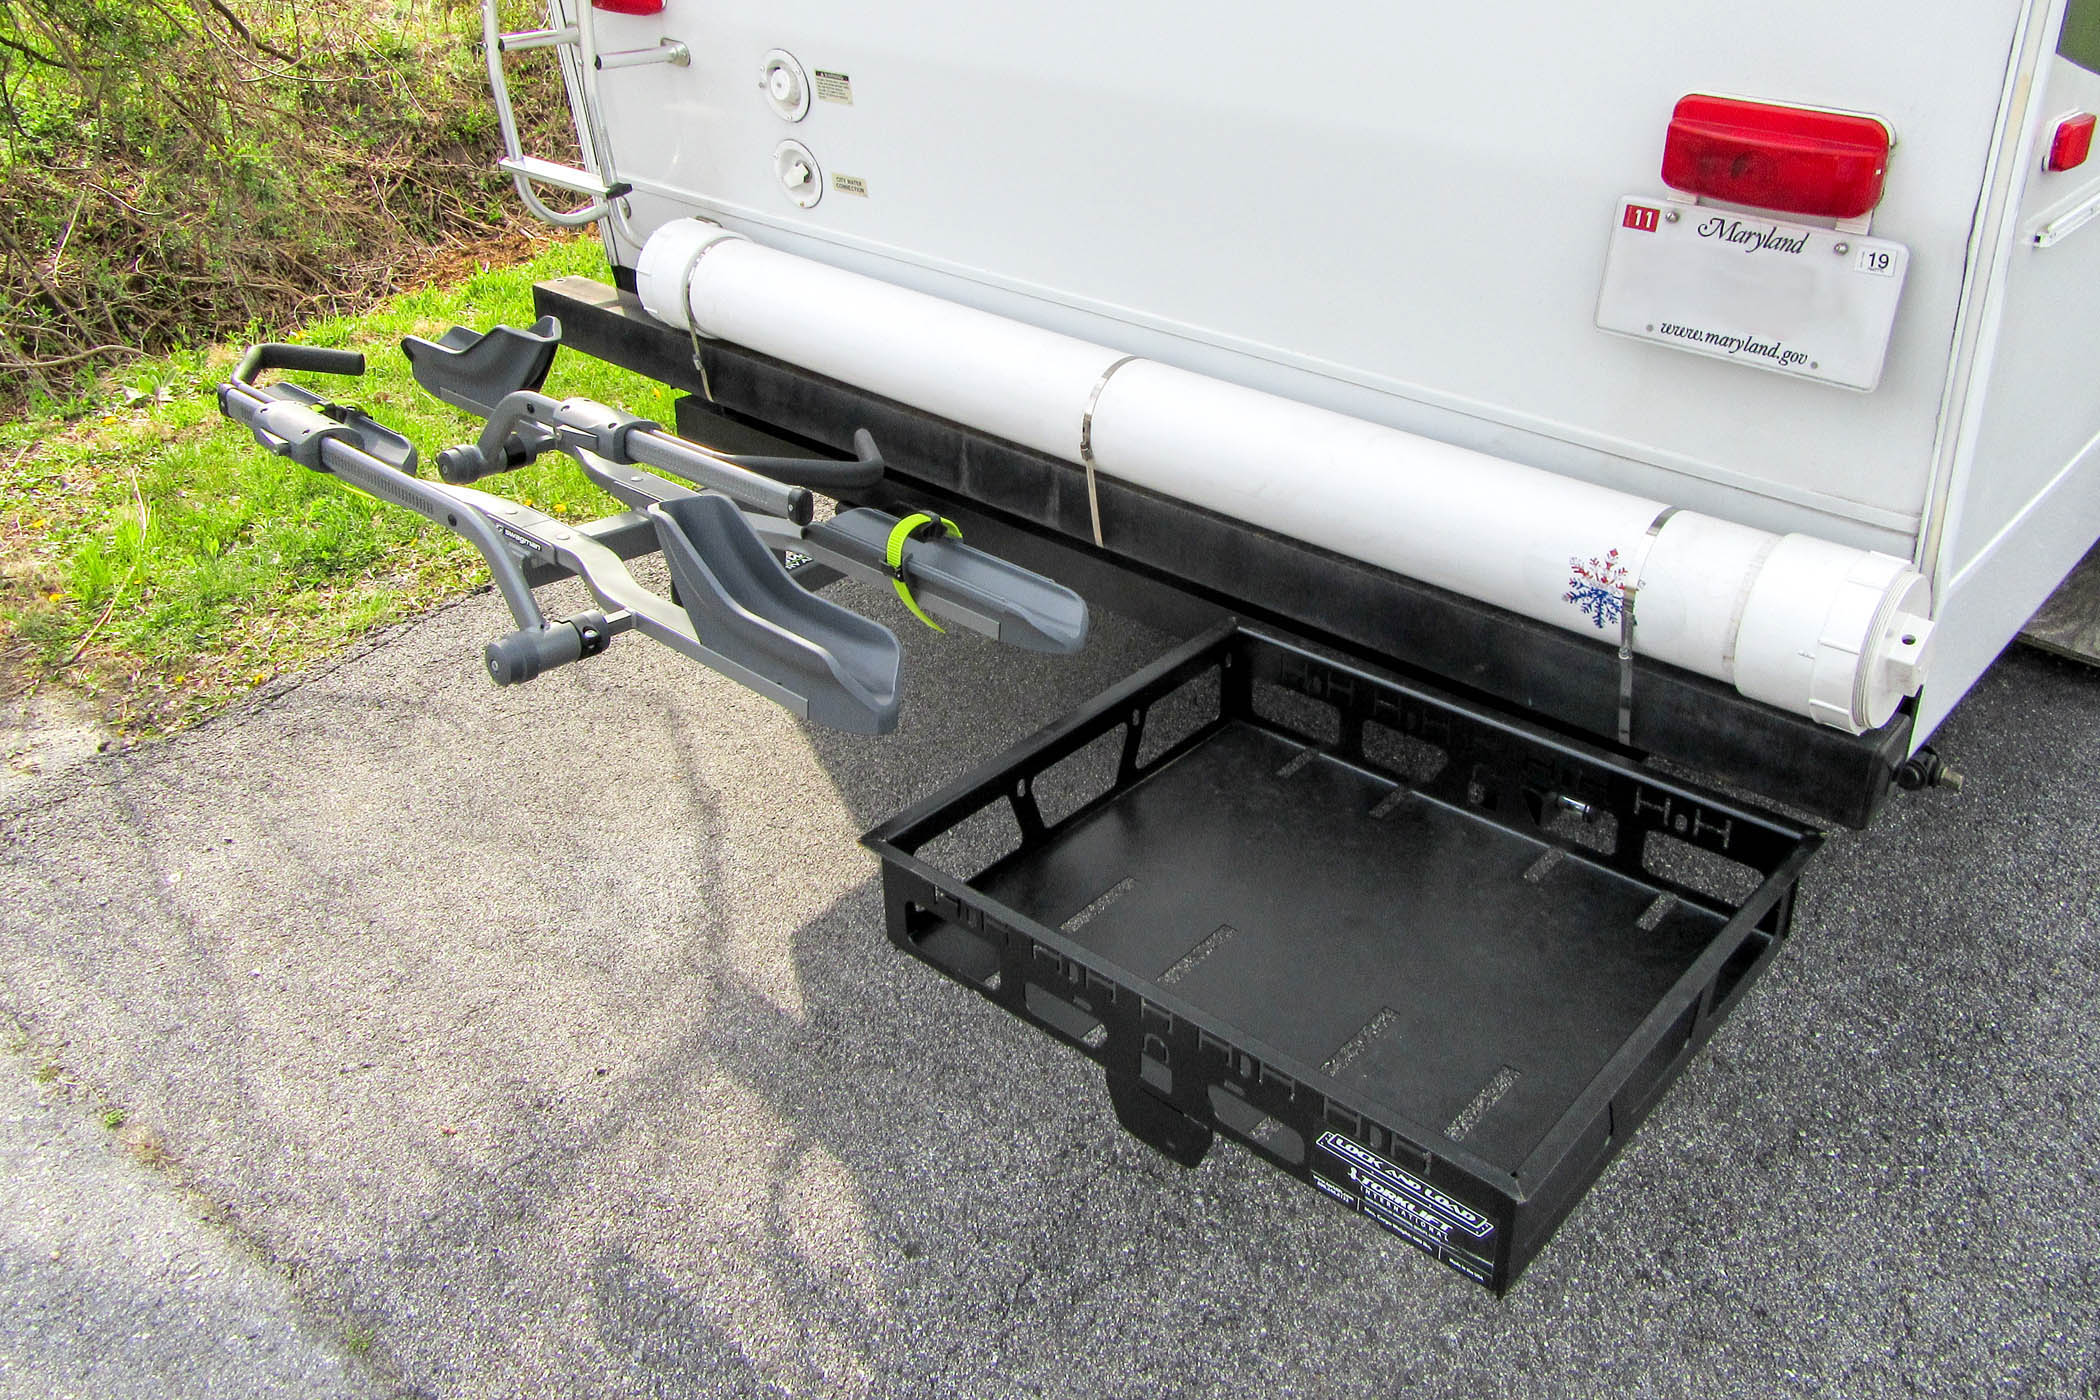
We’ve been using attachment points by Yakima called Locking Blockheads (https://www.yakima.com/locking-blockhead) in the bed of our truck. They work great but … it’s not the easiest thing to use with a 5r. You’re either putting the bikes in first, then trying to hitch up looking thru the bikes, or hitching up first then trying to lift the bikes up into the bed and getting them attached afterwards. It works but … after a while, it’s really a nuisance and a half. We really wanted a rear mounted receiver hitch style bike mount on the back of the trailer. After going to a bunch of bike shops and online research, we decided on a Swagman Escapee (https://www.swagman.net/product/escapee/). What we found a lot is that most bike racks are not approved by most manufactures for rear trailer mounts. There is a lot of constant force applied to a bike rack at the rear of a trailer and most manufacturers won’t certify that their racks can handle these forces. This Swagman is RV Approved.
We also have decided we want a generator. We may not use it often but we want the option to have AC power if we go boondocking or primitive camping. We looked and looked and decided we wanted a generator tray on the back that would lock the generator in place. I didn’t want to keep it in the bed of the truck and have to constantly lift it in and out. We decided to buy a Harbor Freight Predator 3500W generator (https://www.harborfreight.com/engines-generators/inverter-generators/3500-watt-super-quiet-inverter-generator-63584.html). Honda’s are pretty much the ‘king’ of portable generators but … they ain’t cheap. The Predator has great reviews online, nobody who has one hates them. They’re quiet, probably about as quiet as the Honda … and you can buy the 3500W unit for significantly LESS than the Honda 2000W unit. We found one tray just for generators that looked ideal. The Torklift Lock and Load (https://www.torklift.com/rv/lock-and-load)
We considered a bunch of different cargo trays but what I objected to most was the fact that just about every one I saw, was a single center receiver hitch mount. Our setup was going to be a fairly significant amount of weight. I didn’t want to rely on just one receiver. And to add to the dilemma, our rig wasn’t setup for ANY kind of rear receiver hitch capability at all. So … we decided to have a dual receiver custom built hitch system added directly to the frame of our rig. We have an RV repair center in our area called Jim Donnie’s (http://www.jimdonnies.com/) that besides doing RV work, also builds or modifies custom rigs like food trucks and custom trailers. So we enlisted them to design and install our custom two receiver hitch system to handle both the bike rack and the generator tray.


 The campground is very nice. The sites aren’t large, but they are spaced well and there are a good many trees for shade. They also had surprisingly good wi-fi.
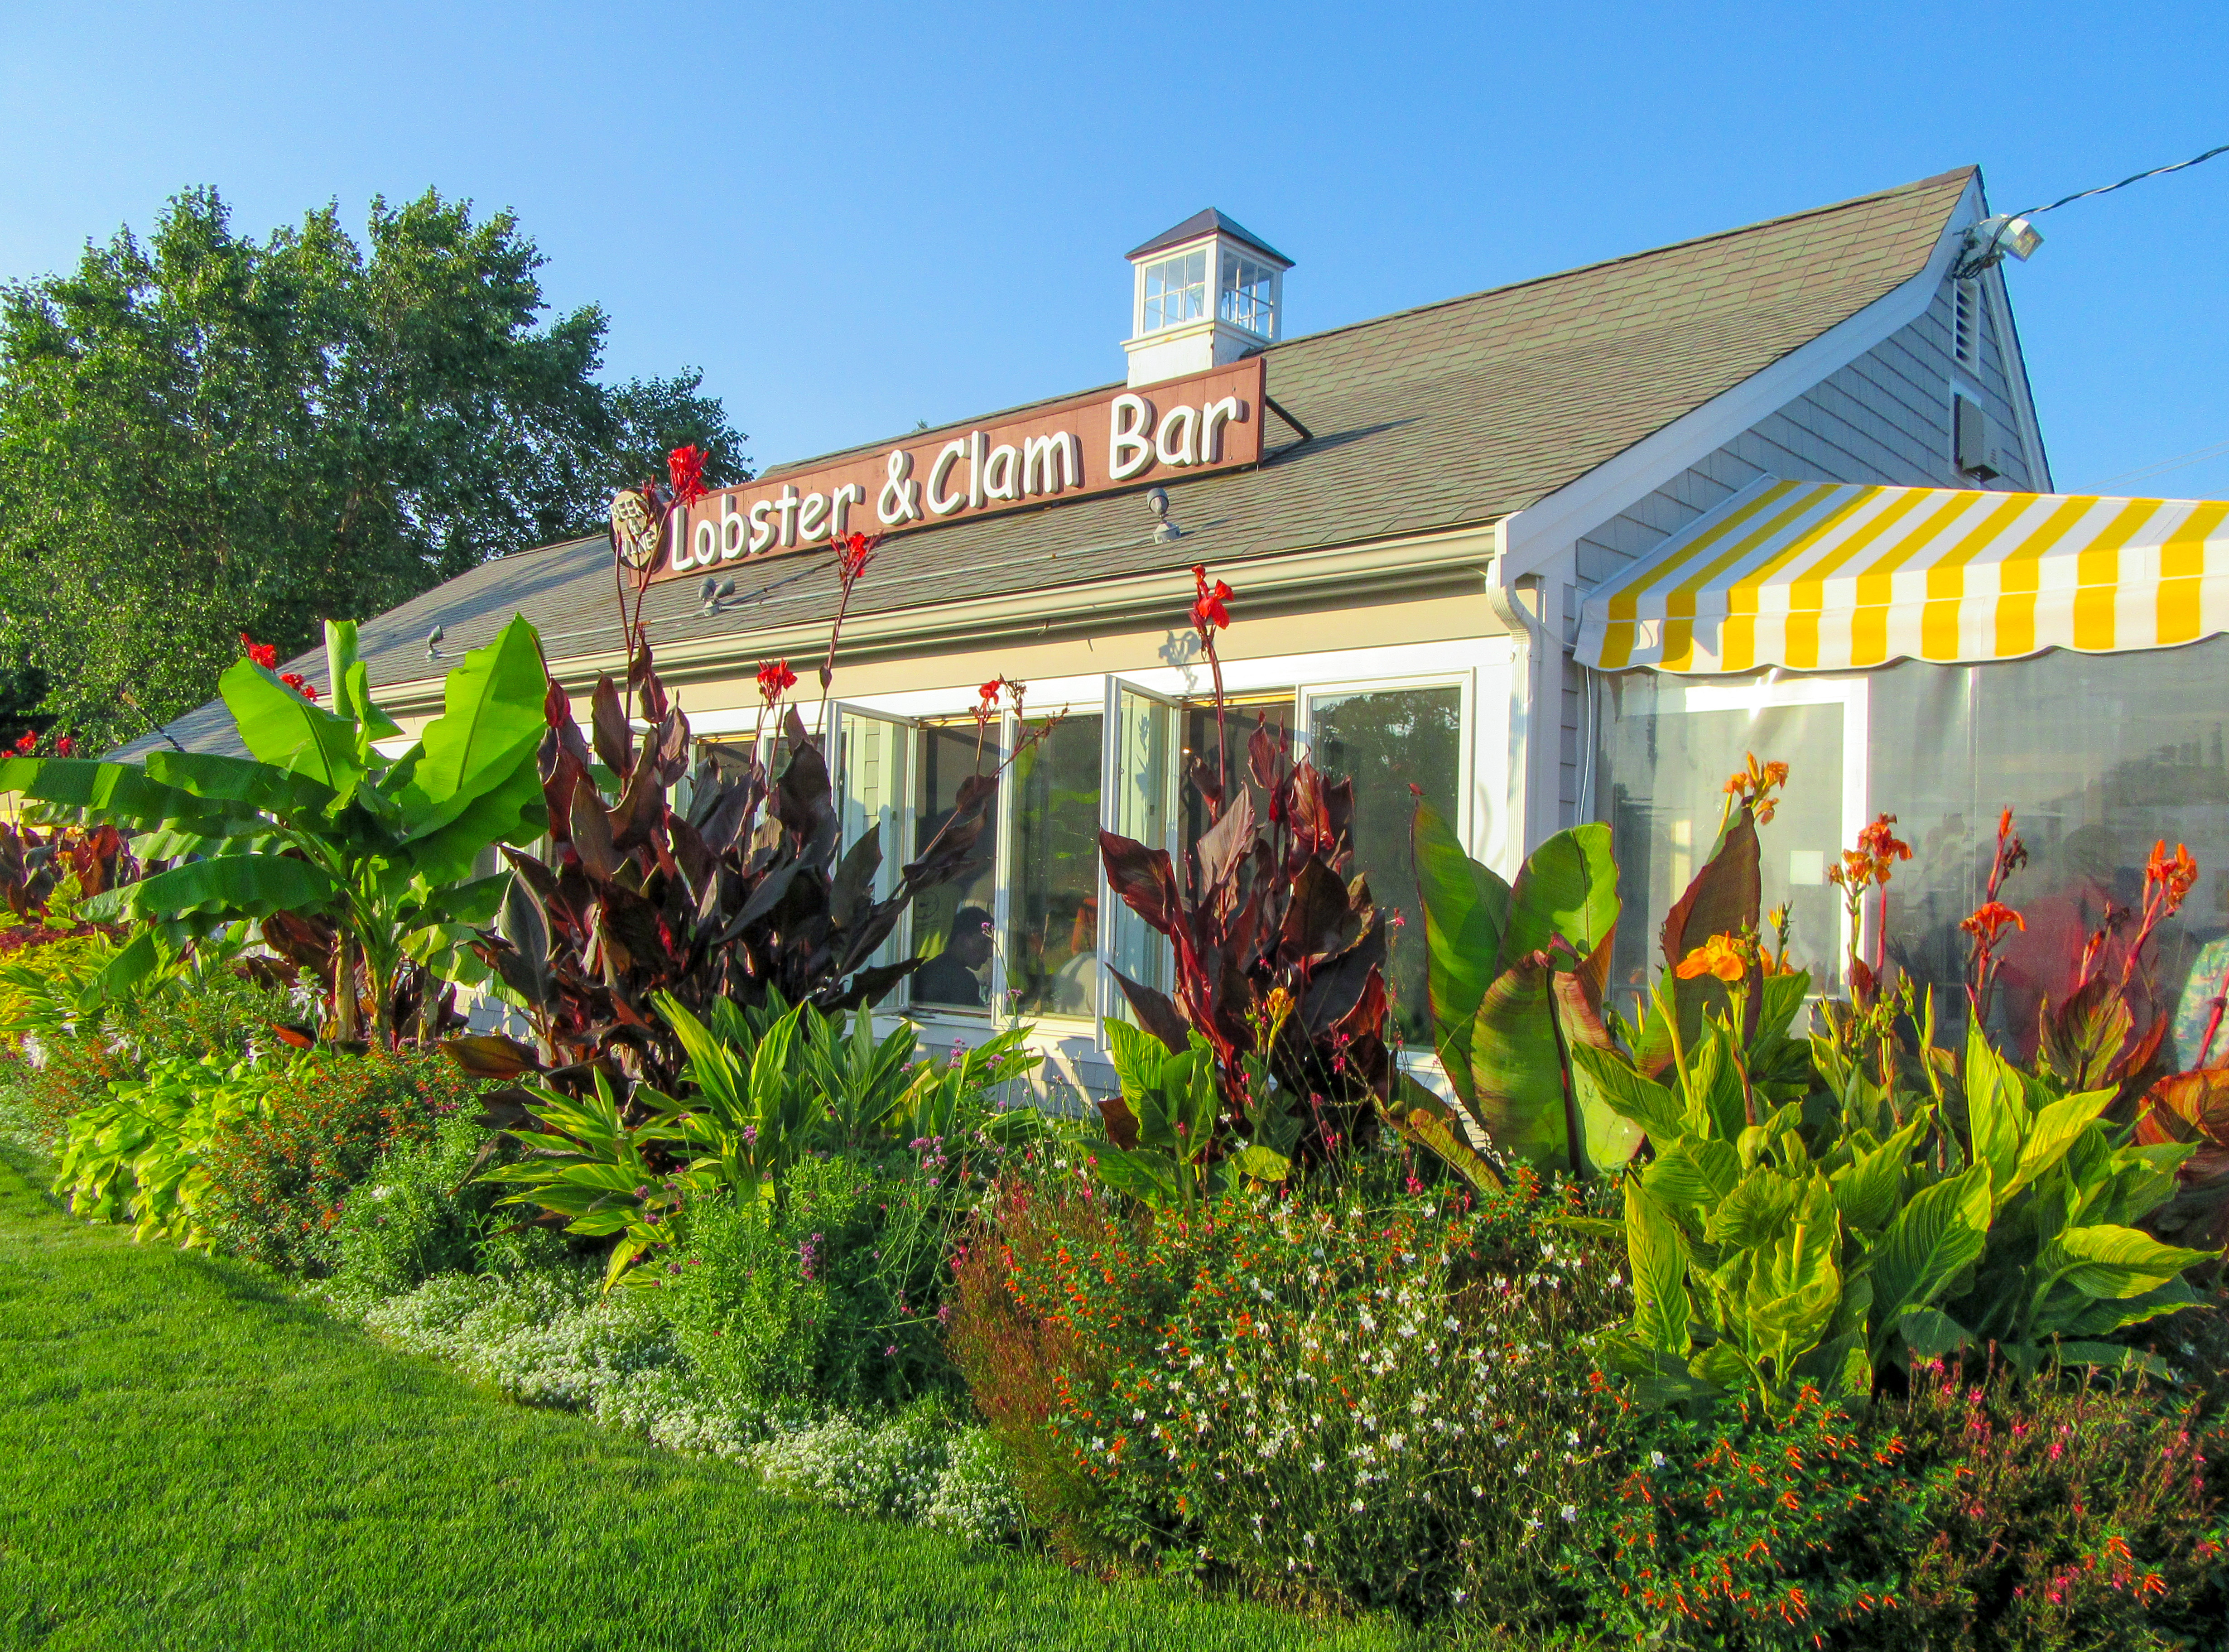

 After lunch we walked around and visited some of the gift shops. We bought a couple of soy candles and Candi bought a new hat with the birthday money from her mother (Thanks, Mom!).

 Then it was back on the bus to visit